Quantcast
Channel: Network – Lester Chan's Website
Viewing all 62 articles
Browse latest View live

Recommended 2-Bay NAS

$
0
0

I purchased my D-Link DNS-323 on the 1st September 2008 during Comex 2008.

3 days ago, my DNS-323 decided to give up on me, just after 1 year and 3 months! The warranty for the DNS-323 is only 1 year so my warranty had just ended! Argh!

I thought I might try my luck, I wrote in to D-Link saying I am a blogger blah blah blah and a huge fan of D-Link, spending SGD$519 worth of D-Link products during IT Show 2009 and to see if out of goodwill, they can RMA for me. But if it fails, at lest I tried and time to hoot a new NAS.

Here is what happen:

  • I found my DNS-323 switched off and immediately power it back on.
  • Works normally after powering it on, but after an hour, the DNS-323 disconnect itself from the network.
  • I tried powering it off and on again by pressing on the power button but to no avail.
  • I have to manually plug out the power cable and plug in back in again and press the power button to power it on.
  • Works normally again, but as usual, after an hour, it disconnect itself from the network again.
  • Power button still does not work, have to manually plug out and in the power cable to reboot it.
  • This time round, the power LED light blinks non-stop after booting up
  • I tried hard reset, swapping the harddisks, removing the harddisks, all could not work, the power light continue to blink.
  • I seek help from my friend, Andy, who is an expert with D-Link products, tried some of his method but still could not get the DNS-323 to hard reset

While waiting for D-Link to reply me, I did some research on 2-Bay NAS and have narrowed down to the following 4 choices which is within my budget.

SYNOLOGY Disk Station DS210j

Price: SGD$408
Official Link: SYNOLOGY Disk Station DS210j

QNAP TS-210

Price: SGD$514
Official Link: QNAP TS-210

NetGear ReadyNAS Duo (Diskless)

Price: SGD$429
Official Link: NetGear ReadyNAS Duo (Diskless)

Thecus N3200 Pro

Price: SGD$499
Official Link: Thecus N3200 Pro
Note: This is 3-Bay NAS, but I included it because it is within my budget.

The purpose of me using a NAS is to share files within my home network and to use it as a BitTorrent machine. I also backed up my files on it, so I will definitely run RAID1 with it. Any recommendations on which one I should settle for eventually? Please leave a comment. Thanks a lot!


Synology DiskStation DS210j

$
0
0

D-Link replied me after a week and a follow-up email from me. The normal repair price is USD$61 (SGD$86) and after the repair is done, I will get an additional 3 months warranty.

However, out of good will, they are willing to give me 30% discount off the repair charges which is now USD$42 (SGD$59) and an additional 3 months warranty, so that makes it 6 months warranty in total. They accept cash only and for some reason they do not quote in SGD$. Weird.

Despite their good gesture, I don’t want to take the risk of my DNS-323 failing again and I have to repeat the whole process of backing up my data onto an external HDD and then copying the data back to the NAS. It is a nightmare and I got a shock and felt lost when my NAS fails.

I decided to get a new and better NAS instead which is the Synology Disk Station DS210j. Got it for SGD$408 from Memory World at Funan. I think this is the last piece available in Singapore, the next shipment is coming in next month. Thanks to KK from Funan’s Memory World for reserving it for me. You can go look for him if you are looking to buy any Qnap or Synology NAS =)


Box


Box Contents


DS210j


Front


Back


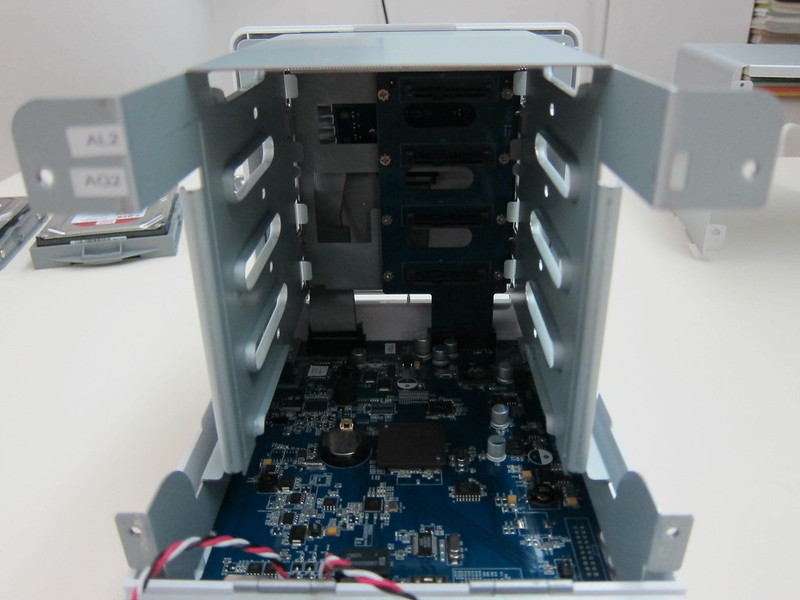
Open


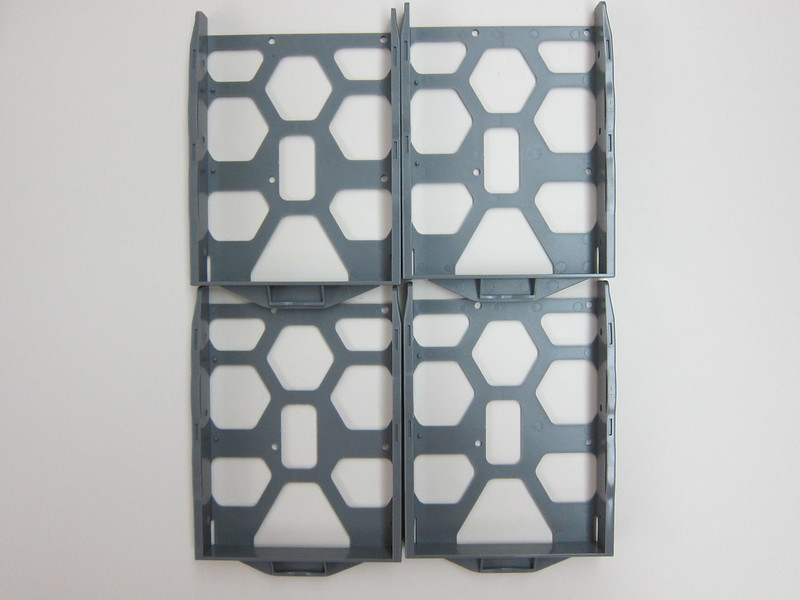
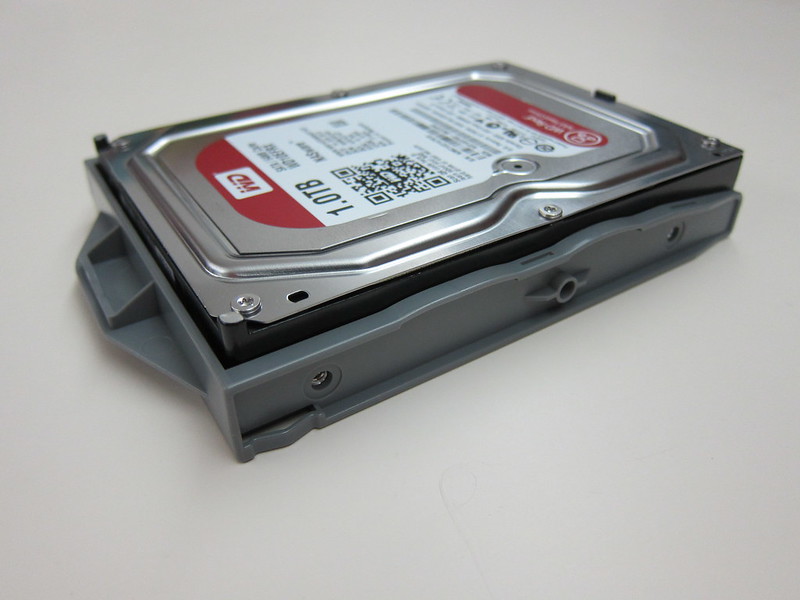
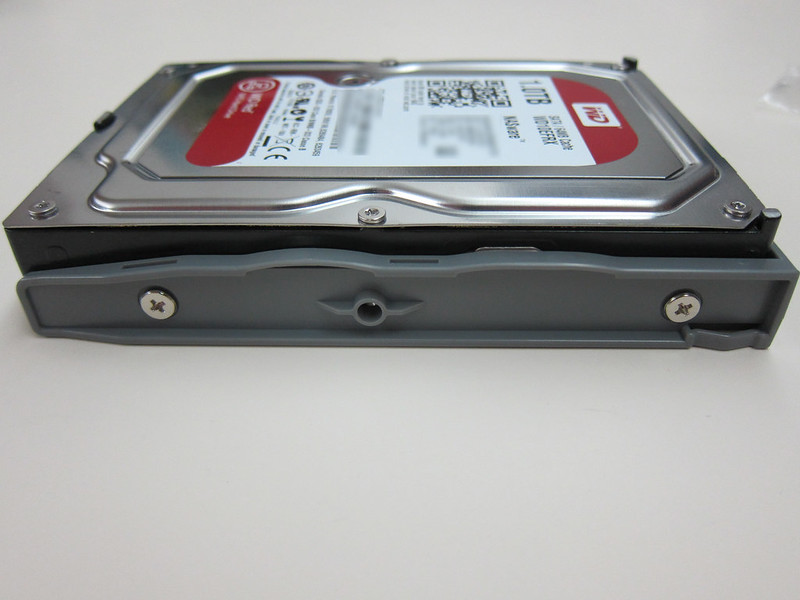
Inserting HDD


DS210j On My Table

I am still considering whether or not to take on the good will and repair the NAS and keep it for other purposes or sell it away.

Iomega 1st Blogging Event

$
0
0

When I posted my pictures of Iomega 1st Blogging Event which happened yesterday, many thought that Iomega is dead after their Zip Drive failed to penetrate the market because of the widespread of USB flash drives. But in fact they have been bought over by EMC which is a Fotune 500 company and specializes in data storage for USD$213 million.

But yeap, now they are back. I kinda like Iomega products, I got their 100MB, 250MB and 750MB Zip Drives and I got a few old computers which is using their CD Writer and it is still working till today. BTW, TDK DVD Writer sucks, mine was spoilt before even reaching 2 years.

EMC acquisition of Iomega is to bring their storage technology to SMEs and home users at a more affordable price. The selling point of Iomega network and portable harddrives is not the harddrive itself but the software that comes with it.

Iomega vClone is one such software and it allows you to clone your computer into a harddrive and run it at on another computer as if it is your own personal computer. They have partnered with VMware for this to happen.

Capture a complete virtual image of your PC — including the operating system, all applications, your settings, and all your files to your Iomega hard drive. Access the cloned copy and use it seamlessly on another computer, just as if you’re working from your own PC. When you reconnect, automatically sync your data to your primary PC – everything is always up to date. Only Iomega offers this powerful solution.


Iomega Products Offering


Iomega Harddrive Features

Another technology they built into their eGo portable harddisk drive is the Iomega Drop Guard feature which protects the drive when dropped up to 1.3m. But seriously, I hope I do not ever drop my harddrive.

I did ask where is Iomega RMA center, they just told me it is in Sim Lim Square but did not give me a specific address. After Googling, I found out Iomega products are being distributed by Acecom and their service center has move to Ubi. Here is the address:

No 1 Ubi View #03-11
Focus One, Singapore 408555
Tel: (65) 6326-4098 / (65) 6326-4097
Fax: (65) 6509 0825
Mon to Fri : 9:00 to 18:00
Sat/Sun/PH : Close


Iomega Aluminium UltraMax & UltraMax Plus External Harddrive


And Their Respective Boxes

I am pretty interested in the Iomega UltraMax External Harddrive as it will be a great companion to my Mac in terms of design and I shall use it for my Time Machine backup.

More Photos

Huawei MiFi E585

$
0
0

Bought the Huawei MiFi E585 for SGD$185 from Amos of Hardware Zone Forums. It is a mobile router that makes use of your SIM card to connect to the Internet and the router itself supports 5 devices simultaneously.

It is similar to any 3G Modems but instead of only allowing one device (normally only computer) to use it via USB port, the MiFi allows up to 5 devices as long as the device have WiFi support which most if not all of the smartphones these days do. The MiFi is essentially a mobile router and hence it is capable of basic router functions such as DMZ, DHCP, SSID configuration, etc. You can configure those options using the router’s web-based interface (192.168.1.1) and the interface is mobile friendly as well. The E585 also comes with a MicroSD slot that you can use it as a shared storage for all the connected devices.

Of course there are cons to the E585 which is the the reliance on battery, the Huawei E180 3G Modem does not need a battery to operate because it draws power directly from your computer’s USB port. As it is meant to be portable and you can use it with other devices (not just a computer), the MiFi has a removable battery that supports up to 7 hours of usage. But of course you if you are using it with your computer, you can charge it using your computer’s USB port and use it at the same time.

Amos was one of the better sellers that I came across. As the product was delayed by a few days because of supplier issues, he keep you up to date with the situation by SMSing you. Once you are there to collect the product, he will verify your phone number with your name to ensure that you are who you are (I am not the only one ordering it). He will unseal the box in front of you, go through step by step on how to setup the E585 as well as how to RMA it incase there are problems with it. My first impression of him is he is very detailed and organized.


Box Front


Box Contents #1


Box Contents #2


E585 Front View


E585 Back View


E585 UI


E585 Web Dashboard

D-Link DGS-1008D

$
0
0

On the night of the PC Show 2011, my brother called me and said the D-Link DGS-1008D (which I got back in IT Show 2009) switch in my room is spoilt and there is no power being supplied to it. Went back home, tested and verified that it is the case.

Went down the next day to PC Show 2011 again and got back the same switch, D-Link DGS-1008D switch, for SGD$85. I was expecting them to change the model number since it is totally a new design, but unfortunately it remains the same. This time I got 2 pieces instead of just 1 as I will be placing the additional switch in the living room to facilitate the switch to Fibre Internet.


Box Front View


8 Ports


Switch In My Room


Switch In The Living Room

Sapido MB-1132 (N+ Mobile Router)

$
0
0

Got the Sapido MB-1132 for NT$1,790 (~SGD$76.83). Thanks to my relative, Andy, who got it from Guang Hua Digital Plaza in Taiwan when he was there to attend Computex 2011.

The Sapido MB-1132 was recommended by Justin Lee and I was impressed by what it can do. In a nutshell, it can:

  • Charge your USB devices
  • Act as a router by plugging in a LAN cable with Internet connectivity to create a Wi-Fi hotspot
  • Connect your iPhone/Android phone to it or even a 3G USB Dongle and it can create a Wi-Fi hotspot
  • Re-broadcast Wi-Fi (eg: if you paid for Wi-Fi, login to the paid service using MB-1132 and re-broadcast your own Wi-Fi it so others can use it for free)
  • Compact & lightweight, good for travelling

There is also a similar model called Sapido MB-1112 (N+ Mobile 3.75G Modem Router). It is identical to the Sapido MB-1132 except that the Sapido MB-1112 does not allow Internet sharing via iPhone/Android/3G Dongle. You have to put in a 3G SIM card in order to create a Wi-Fi hotspot.

I have not seen these devices at any computer stores yet (have not check Sim Lim Square), but checking their website, they do have an office in Singapore:

SAPIDO Singapore (Vasss Pte Ltd)
www.sapido.com.sg
9010, Tampines Street 93, #02-79, Singapore 528844
Tel: + 6789 8310 / 3131 9038
Fax: + 6788 3213


Box Front


Box Back


MB-1132 Front


MB-1132 Bottom

Bridging Huawei HG256s & D-Link DIR-855

$
0
0

Went to StarHub Shop at VivoCity on the 24th June 2011 to apply for MaxOnline Infinity which is Starhub fibre Internet service. I chose the MaxInfinity Elite plan which has a download speed of 150Mbps, upload speed of 75Mbps and international speed of 15Mbps. It cost SGD$82.18 per month for a 2 year contract.

They did not tell me when they are coming to setup the fibre Internet service. I waited a month and they called me on the 3rd week of July 2011 saying they will come on 26th July 2011 to install the service.

StarHub is forcing us to use the crappy Huawei HG256s Residential Gateway (RG) and there is no way to bypass it yet. I heard the wireless on it is just pure shitty. So the typical setup would be:

Terminal Point (TP) -> Optical Network Terminal (ONT) -> Residential Gateway (RG) -> Router

If order to get your router to do the routing you need to bridge the connection between the RG and Router.

Step 1: You need to disable WLAN and DHCP on the RG


Disable WLAN on RG


Disable DHCP on RG

Step 2: Enable DMZ on the RG


Enable DMZ on RG

My RG’s IP address is 192.168.2.1 and my router WAN Port is connected to my RG’s LAN Port 1 with WAN Static IP address set to 192.168.2.2 on the router.

My router IP address is 192.168.3.1.

RG (192.168.2.1) -> DMZ (192.168.2.2) WAN -> Router (192.168.3.1)

Step 3: Setting WAN Static IP on the Router


Setting WAN Static IP on Router


Router IP Setup

That is basically it. I have disabled all the firewall features on the RG side and let the router handle it. DDNS on the other hand is handled by the RG instead of the router.


DDNS on RG

Since the router is behind RG’s DMZ, port forwarding is handled by the router.


Port Forwarding on Router


BEFORE (Cable): Speedtest – MaxOnline Ultimate (100Mbps)


AFTER (Fibre): Speedtest – MaxOnline Inifnity Elite (150Mbps)

I am unable to obtain 150Mbps speed though. I am wondering if Speedtest can output more than 100Mbps. However I am able to obtain about 80Mbps on 2 computers while doing Speedtest simultaneously. I did my speedtest on StarHub’s Speedtest before doing it on Speedtest.net.

Upon further investigation, I am actually on 150Mbps, I downloaded a iPad 2 firmware update (iOS 4.3.5) from Apple and I am getting about 16MB/s to 18MB/s which is about 128Mbps to 144Mbps. Woot!

Credits
Thanks to MarineX for his post on HardwareZone Forums.

D-Link DNS-320

$
0
0

Bought the D-Link DNS-320 (SGD$109) and 2x Western Digital 3.5″ SATA Caviar Black 1TB hard drive (SGD$115 each) at Comex 2011 last weekend.

I still bought back a D-Link NAS after my bad experience with D-Link DNS-323 because the DNS-320 is meant for my mom’s office and D-Link service center is just located behind my mom’s office in case anything happens.

I wanted to get the Synology DS211j instead but unfortunately it is out of my mom’s budget. I initially also wanted to get the Buffalo LinkStation Pro Duo, but after reading SmallNetBuilder’s review on it, I decided to give it a miss as the review was pretty bad.

The differences between DNS-320 and DNS-323 is quite significant. Now the hard disk is loaded via the top which makes it slightly easier to install as compared to front loading. The user interface has also been revamped and now it bares no resemblance to the usual orange/white/grey D-Link’s interface, it is a much welcomed change but it is a little laggy though. So far for NAS, I have not seen a better web interface than Synology’s DiskStation Manager (DSM).

For a more technical review, check out my friend, shadowandy, blog post entitled D-Link DNS-320 – Layman speed test.


D-Link DNS-320 Box


Western Digital 3.5″ SATA Caviar Black 1TB


HDD Is Now Loaded Via The Top


DNS-320


Brand New User Interface


Cisco Linksys EA4500 Router Review + Giveaway

$
0
0

Cisco launched the new Cisco Linksys EA4500 Router that is retailing for SGD$299 back in June 2012. It incorporates the new Cisco Connect Cloud which enables you to connect, control and interact with your router and it’s connected devices wherever you are as long as you are connected to the Internet.

Specifications (From WikiDevi)

  • Processor: 1.2 GHz Marvell Processor (Marvell 88F6W01)
  • RAM: 128 MB (Hynix H5PS1G63EFR-S6C)
  • Flash: 128 MB (Hynix H27U1G8F2BTR-BC)
  • Technology: Wireless-N
  • Bands: Simultaneous 2.4 GHz & 5 GHz
  • 2.4 GHz Band
    • Up to 450 Mbps
    • Marvell 88W8063/88W8366
    • SiGe SE2598L 2.4 GHz P.A. (x3)
  • 5 GHz Band
    • Up to 450 Mbps
    • Marvell 88W8063/88W8366
    • SiGe SE2567L 5 GHz P.A. (x3)
  • Antennas: 6 Internal
  • USB port: Yes (shared storage, virtual USB and media server)
  • Ports: 4x Gigabit (Marvell 88E6171R)
  • IPv6 Support: Native IPv6 and 6rd support
  • Cisco Connect Software: Yes, App Enabled
  • OS Compatibility: Windows, Mac
  • Dimensions (w x h x d): 22.5 x 2.5 x 16 cm
  • Weight: 360g

Cisco Linksys EA4500 - Box Front
Cisco Linksys EA4500 – Box Front

Cisco Linksys EA4500 - Box Back
Cisco Linksys EA4500 – Box Back

Cisco Linksys EA4500 - Box Contents
Cisco Linksys EA4500 – Box Contents

Cisco Linksys EA4500

Cisco Linksys EA4500 - Front View
Cisco Linksys EA4500 – Front View

Cisco Linksys EA4500 - Back View
Cisco Linksys EA4500 – Back View

Cisco Linksys EA4500 - Ports
Cisco Linksys EA4500 – Ports

  • 4x Gigabit Port
  • 1x Internet/WAN Port
  • Wi-Fi Protected Setup (WPS) Button
  • 1x USB Port
  • Reset Button
  • Power Port

Setup
Setting up takes me about 10 minutes. I am currently using the D-Link DIR-855 which I got it for SGD$299 back in March 2009. As I do not want to disrupt my current network, I used my MacBook Air to setup the Cisco Linksys EA4500 instead of my primary computer which is my Windows Desktop.

Cisco Linksys EA4500 - Setup
Cisco Linksys EA4500 – Setup

The setup disc provided in the package works for both Mac and PC. You need to click “Next” about 6 times throughout the whole process, so it is roughly about a 7-step setup procedure.

Cisco Linksys EA4500 - Setup Done
Cisco Linksys EA4500 – Setup Done

Once the setup is done, you will be asked to “Launch Cisco Connect Cloud”.

Cisco Connect Cloud
Cisco Connect Cloud in layman terms is essentially the ability to access your router’s settings via ciscoconnectcloud.com (Browser), iOS (App Store) or Android (Google Play).

Cisco Connect Cloud - Register
Cisco Connect Cloud – Register

Cisco Linksys EA4500 - Setup Done
Cisco Linksys EA4500 – Setup Done

Registering for Cisco Connect Cloud is straightforward, it is pretty much the same as how you resister for membership for websites. Register -> EMail Verification -> Login. Once your email has been verified, you can close your browser and the setup screen will now display a “Close” button.

Cisco Linksys EA4500 - Files Created
Cisco Linksys EA4500 – Files Created

The setup also creates a “Cisco Connect Cloud.txt” which contains your login information to Cisco Connect Cloud as well as a shortcut link to ciscoconnectcloud.com.

If you are using a browser, you can access your router settings by typing ciscoconnectcloud.com or your internal router IP (Eg: http://192.168.3.1) in the address bar.

Cisco Connect Cloud - Home
Cisco Connect Cloud – Home

So not to worry, if your Internet is down, you are still able to access your router via it’s internal IP. If you do not like the idea of your router settings being exposed over the Internet, you have the option to disable it as well.

Cisco Connect Cloud - Internet Down
Cisco Connect Cloud – Internet Down

Cisco Connect Cloud - Admin
Cisco Connect Cloud – Admin

As mentioned earlier, Cisco Connect Cloud is also available on iOS and Android and these app uses ciscoconnectcloud.com and hence an Internet connection is required.

Cisco Connect Cloud - iOS/AndroidCisco Connect Cloud - iOS/Android
Cisco Connect Cloud – iOS/Android

Cisco Connect Cloud - iOS/AndroidCisco Connect Cloud - iOS/Android
Cisco Connect Cloud – iOS/Android

Stating the obvious, you will be able to control everything using a browser via ciscoconnectcloud.com but when you are using the mobile phone app, only selected features will be available. The most obvious feature that is not available will be the management of USB Storage and Speed Test. I have no idea why Cisco decided to exclude the management of USB Storage that because personally, I kinda like that feature more.

My network setup is horribly messy thanks to the crap Huawei Residential Gateway (RG) provided by StarHub. I did bridge my DIR-855 with the RG and I applied the same settings to the EA4500 and it works fine.

Cisco Connect Cloud - Internet Settings
Cisco Connect Cloud – Internet Settings

The UI for Cisco Connect Cloud is very sleek and nice looking, but the problem with fanciful UI is that it is often slow which is the case for Cisco Connect Cloud. This may not be that noticeable for novice users who are having their first Cisco Linksys router.

But for power users, having been used to the classic Linksys UI since the WRT54G days, I have problem finding certain settings. It took me a while to find DHCP reservations options and DDNS options. A quick Google search also bring me to a forum thread with 22 pages of people complaining about the new UI and they want the option to switch back to the classic UI. I hope Cisco will consider that in the next firmware release.

Performance
In terms of performance, it is on par with my DIR-855 from 3 years ago.

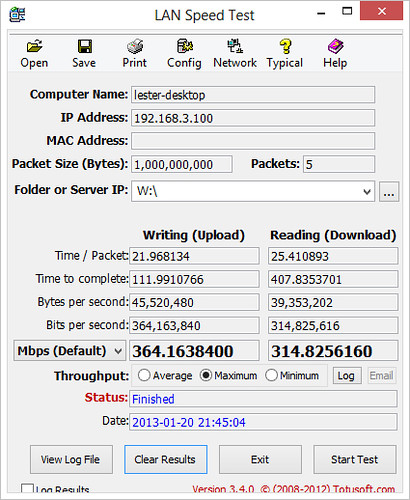
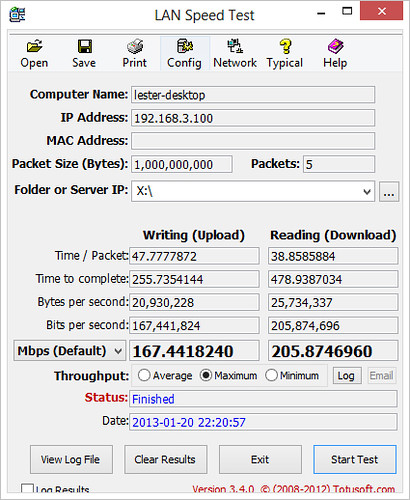
Did a LAN Speed Test to transfer 5x 1GB file to both my brother PC and my NAS and the results are as shown:

PC LAN Speed Test (Left: DIR-855, Right: EA4500)PC LAN Speed Test (Left: DIR-855, Right: EA4500)
PC LAN Speed Test (Left: DIR-855, Right: EA4500)

NAS LAN Speed Test (Left: DIR-855, Right: EA4500)NAS LAN Speed Test (Left: DIR-855, Right: EA4500)
NAS LAN Speed Test (Left: DIR-855, Right: EA4500)

Even with WiFi signal strength, it is almost the same. Using WiFi Explorer on my MacBook Air, here is what I get:

  • MacBook Air – My Room: 80% (DIR-855) vs 78% (EA4500)
  • MacBook Air – Toilet: 56% (DIR-855) vs 72% (EA4500)

On my Galaxy Nexus, I am using WiFi Analyzer. The higher the dBm the better (Eg: -65dBm is better than -77dBm).

  • Galaxy Nexus – My Room: -65dBm (DIR-855) vs -67dBm (EA4500)
  • Galaxy Nexus – Kitchen: -65dBm (DIR-855) vs -66dBm (EA4500)
  • Galaxy Nexus – Downstairs: -77dBm (DIR-855) vs -78dBm (EA4500)

I don’t own a Windows laptop, so I can’t use LAN Speed Test to test the wireless speed. I only found one good alternative on Mac App Store which is called Speedy Net. I managed to get 108Mbps when transferring from my MacBook Air (LAN) to my Dad’s iMac (Wireless) on 5GHz band with 40MHz channel width. But for wireless transfer between the both computers on the same wireless settings, I get only 65Mbps. For 2.4GHz band it drops to 33Mbps.

According to my Utilities -> Network Utility, I am connected to the router at 300Mbps. I did several Google searches and it seems that despite that the router is connected at 300Mbps, the real world transfer speed averages about 100Mbps.

MacBook Air (LAN) to iMac (Wireless) vs MacBook Air (Wireless) to iMac (Wireless)MacBook Air (LAN) to iMac (Wireless) vs MacBook Air (Wireless) to iMac (Wireless)
MacBook Air (LAN) to iMac (Wireless) vs MacBook Air (Wireless) to iMac (Wireless)

Gallery
I took tons of screenshots on the Cisco Connect Cloud, you can view them in my Flickr Gallery Set: Cisco Linksys EA4500 Router or checkout the embedded gallery below:

Summary
Pros:

  • Router is sleek looking
  • Easy to setup for novice users
  • UI is visually pleasant
  • Decent wireless coverage
  • Decent LAN and wireless speed

Cons:

  • Slow and non-intuitive UI
  • Expensive

Giveaway
Thanks to Cisco Linksys, I will be giving out a brand new Cisco Linksys EA4500 Router worth SGD$299 to 1 lucky winner.

To particiate, all you have to do is the following:

  • Tweet about anything you can think of that goes well with the giveaway hashtag, #hubofmyhome.
  • Ensure that your tweet contains #hubofmyhome (giveaway hashtag) and http://lc.sg/1l8 (link to this blog post) in it.
  • Be as creative and original as possible as entries will be judged based on these 2 criteria.

Examples:

  • My husband is the heart and #hubofmyhome http://lc.sg/1l8
  • My router is spoilt! I need to replace the #hubofmyhome like right now! http://lc.sg/1l8
  • I wonder how much 1s and 0s pass through the #hubofmyhome every second http://lc.sg/1l8

Fine Print

  • This Giveaway is open to all readers of lesterchan.net who are based in Singapore.
  • Li Xiang and I will be the judges for this contest, entries will be judged based on creativity and originality.
  • Winners will be announced in August 2012 and contacted via Twitter and follow up by email.
  • Cisco Linksys will be sending the prizes to the winner directly.
  • Details of winners such as name and winning tweet may be posted on lesterchan.net.
  • My decision on all matters related to this giveaway is final and no correspondence will be entertained.
  • I reserve the right to amend these terms and conditions at anytime without prior notice.
  • This giveaway ends on 11:59pm (23:59), Monday, 30th July 2012 (GMT+8 Singapore Time).

Buffalo AirStation HighPower WCR-HP-G300 Review

$
0
0

The Buffalo AirStation HighPower WCR-HP-G300 is a budget router that is retailing only for SGD$59. Since it is targeted at lower end consumers, the specifications are just entry level.

The router is only able to support LAN/WAN speeds of 10/100Mbps and 2.4GHz band for Wireless-N speed up to 300Mbps. On a side note, the router is extremely light.

Specifications

  • Wireless LAN Interface
    • Standard Compliance: IEEE802.11n/g/b
    • Transmission Method: Direct Sequence Spread Spectrum (DSSS), OFDM, MIMO
    • Transmission Rate: EEE802.11n (Max. 300 Mbps), IEEE802.11g (Max. 54 Mbps), IEEE802.11b (Max. 11 Mbps)
    • Security: WPA2-PSK(AES), WPA-PSK(AES), 128/64bit WEP
    • Antenna: 2 x 8 dBi detachable antennas
  • Wired LAN Internet
    • Standard Compliance: IEEE802.3/3u
    • Speed and Flow Control: 100/10 Mbps (Auto-Sensing)
    • Number of WAN Ports: 4
    • Connector Type: RJ-45 (Auto MDIX)
  • WAN Interface
    • Transmission Rate: 100/10 Mbps (Auto-Sensing)
    • Number of WAN Ports: 1
    • Connector Type: RJ-45 (Auto MDIX)
    • WAN Security: Dynamic Packet Filtering, Intrusion Detector, NAT/SPI Firewall
  • Others
    • Dimensions (WxHxD): 120 x 105 x 22 mm (Exclude antennas)
    • Net Weight: 208g
    • Warranty: 3-Year

Buffalo AirStation HighPower WCR-HP-G300 - Package Contents
Buffalo AirStation HighPower WCR-HP-G300 – Package Contents

Buffalo AirStation HighPower WCR-HP-G300

Buffalo AirStation HighPower WCR-HP-G300 - Ports
Buffalo AirStation HighPower WCR-HP-G300 – Ports

Admin User Interface
The admin user interface loads extremely fast because there are no fanciful graphics, but the information architecture of the user interface as a while is quite confusing. It took me a while to get used to.

Buffalo AirStation HighPower WCR-HP-G300 - UI Home
Buffalo AirStation HighPower WCR-HP-G300 – UI Home

Buffalo AirStation HighPower WCR-HP-G300 - Setting Up WiFi
Buffalo AirStation HighPower WCR-HP-G300 – Setting Up WiFi

There are quite a lot of technically terms in the UI that I do not fully understand. It is weird that they are targeting lower end consumers because I am guessing these group of customers will not have sufficient knowledge to understand those terms. Honestly, I have no idea what the below screenshot does when I first saw it, I need to Google and read through articles.

Buffalo AirStation HighPower WCR-HP-G300 - WMM
Buffalo AirStation HighPower WCR-HP-G300 – WMM

Speed Test
Since this router only supports up to 10/100Mbps for LAN/WAN, transferring large file could take some time.

WiFi to WiFi Test
WiFi to WiFi Test

LAN to WiFi Test
LAN to WiFi Test

LAN to Lan Test
LAN to Lan Test

I am pretty satisfied with the LAN to LAN speed test because it almost max out at 100Mbps. For WiFi speed, I think it is acceptable because for 1/5 of the price of the Cisco Linksys EA4500 Router it can perform 50% of what the EA4500 can do.

Just a side note, my MacBook Air connects to the router at 144Mbps speed.

Signal Test

Signal Strength In My House Toilet

Signal Strength In My Room

Don’t let the tall antenna of this router fool you, in fact the signal strength is pretty weak especially if you have multiple walls in between the router and the location (like my house’s toilet).

  • MacBook Air – My Room: 80% (DIR-855) vs 78% (EA4500) vs 59% (WCR-HP-G300)
  • MacBook Air – Toilet: 56% (DIR-855) vs 72% (EA4500) vs 33% (WCR-HP-G300)

Summary
Pros:

  • Inexpensive
  • Decent LAN and wireless speed

Cons:

  • Weak wireless signal
  • UI is too technical
  • No Gigabit Ethernet support

You can also check out VR-Zone review on this router.

Cisco Linksys EA6500 Router Review

$
0
0

The Cisco Linksys EA6500 is the successor to the Cisco Linksys EA4500 and is now available in stores and retailing for SGD$349.

It utilizes the new 802.11ac wireless technology (which is still under development) that allows you to have gigabit wireless speed. Most AC routers in the market right now is capable of a theoretical maximum speed of 1.3Gbps (3 x 433.3Mbps streams with 80MHz channels).

Specifications (From WikiDevi)

  • Processor: Broadcom BCM4706 600Mhz Processor
  • RAM: 128 MB (Hynix H5PS5162GFR-Y5C)
  • Flash: 128 MB (Samsung K9F1G08U0D)
  • Technology: Draft 802.11ac
  • Bands: Simultaneous 2.4 GHz & 5 GHz
  • 2.4 GHz Band
    • Up to 450 Mbps
    • Broadcom BCM4331
    • MicroSemi LX5535 2.4 – 2.5 GHz Power Amplifier (x3)
  • 5 GHz Band
    • Up to 1.3 Gbps
    • Broadcom BCM4360
    • Skyworks SE5003L 5 GHz, 23dBm Power Amplifier With Power Detector (x3)
  • Antennas: 6 Internal
  • USB port: 2x USB 2.0 ports (shared storage, virtual USB and media server)
  • Ports: 4x Gigabit (Broadcom BCM4706)
  • IPv6 Support: Native IPv6 and 6rd support
  • Cisco Connect Software: Yes, App Enabled
  • OS Compatibility: Windows, Mac
  • NFC: SimpleTap technology for easy setup

EA6500 - Box Front
EA6500 – Box Front

EA6500 - Box Back
EA6500 – Box Back

EA6500 - Box Contents
EA6500 – Box Contents

EA6500
EA6500

EA6500 - Ports
EA6500 – Ports

EA6500 Size vs EA4500 Size

The EA6500 look similar to the EA4500 except that it is slightly bigger in size and the middle band does not “wrap around” the router. In terms of ports, it is pretty much the same as EA4500 except that it got 1 more extra USB 2.0 port.

I wish Cisco would use USB 3.0 ports instead of USB 2.0 ports.

Cisco Linksys WUMC710
Cisco does not have any 802.11ac USB Adapter yet, but it is coming soon. However, they have the Cisco Linksys WUMC710 Wireless-AC Universal Media Connector which is also available in stores and retailing for SGD$199. The WUMC710 acts like a wireless bridge between your EA6500 router and your computers. There are 4 10/100/1000 Gigabit Ethernet Ports on the WUMC710.

WUMC710 - Box Front
WUMC710 – Box Front

WUMC710 - Box Back
WUMC710 – Box Back

WUMC710 - Box Contents
WUMC710 – Box Contents

WUMC710
WUMC710

WUMC710 - 4 Gigabit Ports
WUMC710 – 4 Gigabit Ports

USB 2.0 has a maximum speed of 480Mbps, which is much slower than the theoretical limit of 1.3Gbps, so if there is a USB adapter, I am pretty sure it will be USB 3.0, which supports up to 5Gbps.

Setup
I reviewed the EA4500 router back in July 2012 and was pretty pleased with the ease of setting it up for the first time.

Since I am using the EA4500, I was thinking whether there is a way to migrate my settings from EA4500 to EA6500. However that is not possible. I tried backing up my configuration on my EA4500 and restoring it on EA6500 and the EA6500 would crash and I have to hard reset it. Since both routers support Cisco Cloud Connect, I have no idea why is it not possible for me to transfer my settings over the cloud.

When I got the review unit, I think the last person did not factory reset it (not an issue), so I have to factory reset it. After I inserted the setup CD on my Mac Book Air’s USB SuperDrive and follow through the setup process, it always ends with an error “A JNAP call to the device failed for an unknown reason”. I tried factory reset followed by setup CD for 5 times and all 5 times failed, and I gave up.

A JNAP call to the device failed for an unknown reason

So I have no choice but to manually login to the router via it’s IP address and configure it manually, you can find the router IP address under System Preference -> Network.

I would not put this down under the cons as my router might be faulty.

The UI is almost the same as the EA4500 since it is based on Cisco Cloud Connect, there is an extra tab under Wireless in the EA6500 which is SimpleTap. SimpleTap is an NFC card that comes with your EA6500 packaging, you can tap it with a NFC enabled Android phone with the Cisco Cloud Connect app installed and it will connect to your home network.

SimpleTap
SimpleTap (Click to enlarge)

Wireless Signal Strength
I placed the EA6500 beside my EA4500 and went to 2 corners of my house to test the signal strength. The EA6500 seems to have better 5GHz signal strength than the EA4500 while the EA4500 seems to have better 2.4Ghz signal strength than the EA6500.

WiFi Signal - MacBook Air - Toilet - EA6500
WiFi Signal – MacBook Air – Toilet – EA6500 (Click to enlarge)

WiFi Signal - MacBook Air - My Room - EA6500
WiFi Signal – MacBook Air – My Room – EA6500 (Click to enlarge)

Wireless Speed
In order to test the wireless speed of 802.11ac, I have to setup the WUMC710 to connect to the EA6500 on an AC Only wireless network on 5GHz band, 80MHz channel. The default IP address of the WUMC710 is http://10.100.1.1/ and the default login credential is “admin” (without quotes) for both username and password. Setting it up is pretty straightforward as shown in the screenshots below.

WUMC710 - Setup 1
WUMC710 – Setup 1

WUMC710 - Setup 2
WUMC710 – Setup 2

I am using Speedy Net to test the transfer speed on both Mac (MacBook Air and iMac). I managed to get an average of about 375Mbps when transferring a 1GB from my MacBook Air (Wired) to iMac (Connected to WUMC710). When I did the same test for EA4500 previously over N on 5GHz band, 40MHz channel, I got about 107Mbps. So the AC is about 3 times faster than N.

Speed Test - Wired To Wireless (AC 5GHz)
Speed Test – Wired To Wireless (AC 5GHz)

For MacBook Air (Wireless) to iMac (Connected to WUMC710) test, I got an average of 73Mbps, which is slightly faster than my previous test on the EA4500, which got me 65Mbps. The bottleneck is definitely the wireless on my MacBook Air. Unfortunately I do not have any more AC wireless devices to test with.

Speed Test - Wireless (N 2.5GHz) To Wireless (AC 5GHz)
Speed Test – Wireless (N 2.5GHz) To Wireless (AC 5GHz)

Summary
If you need 1080p wireless media streaming from your router (which maybe in your room) to your television which is slightly further away (maybe in your living room) and it is not possible or too messy to lay network cables, then the EA6500 with WUMC710 is for you.

If not, I can’t really recommend the EA6500 right now. Firstly, it is expensive as it cost SDG$329 and secondly, there are not many network devices out there that supports 802.11ac.

I would say give the 802.11ac wireless technology a year or 2 to mature and if you need to get a router now, settle for the EA4500 instead.

If you need more detailed review on the EA6500, do checkout SmallNetBuilder’s review on the EA6500: Part 1 & Part 2.

Also do read my review on the EA4500 if you are interested in getting the EA4500 instead.

Pros:

  • Good 5.0GHz coverage
  • Decent AC wireless speed

Cons:

  • Expensive
  • Not many network devices support 802.11ac yet
  • Still using USB 2.0 ports

Western Digital My Net N900 Router Review

$
0
0

Western Digital is entering into the router market with the launch of 3 routers and 2 routers with built-in storage. These routers are priced pretty competitively!

I will be reviewing the My Net N900 which is retailing for SGD$239.

Specifications (From WikiDevi)

  • Processor: Ubicom IP8260U
  • RAM: 256 MB (Samsung K4B1G1646G-BCH9 x 2)
  • Flash: 16 MB (Macronix MX25L12835EMI-10G)
  • Technology: IEEE 802.11 n/g/b/a
  • Bands: Simultaneous 2.4 GHz & 5 GHz
  • 2.4 GHz Band
    • Up to 450 Mbps
    • Atheros AR9381
    • 6976691A205 (manufacturer unknown)
  • 5 GHz Band
    • Up to 450 Mbps
    • Atheros AR9380
    • Skyworks/SiGe SE2595L
  • USB ports: 1x USB 2.0 & 1x USB 3.0
  • Ports: 7x Gigabit (Atheros AR8327N) & 1x WAN Port (Ubicom IP8260U)
  • Exclusive FasTrack Plus technology
  • OS Compatibility: Windows, Mac
  • Dimensions (w x h x d): 156 x 30 x 237 mm
  • Weight: 480g

WD My Net N900 Router - Box Front
WD My Net N900 Router – Box Front

WD My Net N900 Router - Box Back
WD My Net N900 Router – Box Back

WD My Net N900 Router - Box Contents
WD My Net N900 Router – Box Contents

WD My Net N900 Router

Ports/Buttons On My Net N900
I am very impressed with the available ports on the My Net N900, there are 7 Gigabit LAN ports, yeap 7. I have not seen any consumer routers in the market with 7 LAN ports.

WD My Net N900 Router - 7 LAN Ports + 1 WAN Port
WD My Net N900 Router – 7 LAN Ports + 1 WAN Port

Besides the LAN and WAN ports, the back of the router also houses the power button, power socket, 1x USB 3.0 port and 1x USB 2.0 port.

It is weird to see the power button there, this is the first time I am seeing a power button in a router. If I want to reset the router, I normally would just plug out and plug in the power cable, now I just have to toggle the button which is somewhat simpler.

I still find the power button a waste of space as I only reset the router at most once per month.

WD My Net N900 Router - Power Button, Power Socket, 1x USB 3.0 Port, 1x USB 2.0 Port
WD My Net N900 Router – Power Button, Power Socket, 1x USB 3.0 Port, 1x USB 2.0 Port

There are 4 blue LED indicator at the front of the router indicating the power, wireless, Internet connectivity and Wi-Fi Protected Setup (WPS).

WD My Net N900 Router - LED Indicators
WD My Net N900 Router – LED Indicators

There is also a WPS button located at the front which I think is a waste of space and “messes” with the overall front design, if there is a need for this button, it should be at the back, perhaps replacing the power button?

WD My Net N900 Router - WPS Button
WD My Net N900 Router – WPS Button

Built-in Fan
I am not too sure whether existing consumer routers have fan inside them but I have not owned any that has a fan. My Net N900 surprises me with a built-in fan at the bottom. The 4x feet located at the bottom corners of the router provide a gap of 0.5cm between the router and the table for air ventilation. This ensures that the heat can be dissipated easily.

WD My Net N900 Router - Built-in Fan
WD My Net N900 Router – Built-in Fan

Problem With iOS 6 & Cisco Linksys EA4500
I am previously using the Cisco Linksys EA4500 router (SGD$299) and I had issues with iOS 6.0. The issue I had was: it is awfully slow when accessing the App Store and updating apps on the iPhone/iPad. My whole family uses iPhone/iPad and this issue affected all of us ever since we upgraded to iOS 6. I knew it was the router issue because I do not encounter this issue in my office, my mom’s office or Li Xiang home.

Ever since I changed my router to the My Net N900, this issue is no longer there.

Setup
As a Mac user, you have to configure the router via your favourite browser. The default router IP address is http://192.168.1.1 and the default login credentials is admin/password, “admin” is the username and “password” is the password.

If you are a Windows user, there is a CD included which guides you through in setting up the router.

I still like the old fashion way of setting up the router via browser instead of CD because most computers don’t include CD drives these days.

Admin Interface
The admin interface of the router is not very visually appealing, in fact it is the ugliest I have seen. Despite being ugly, every page in the admin interface loads very fast. Given a choice, I rather it loads fast than have a nicely designed one and loads like a tortoise.

They are using PHP instead of Perl (which is what most routers used) to code the admin interface.

WD My Net N900 Router - My Dashboard
WD My Net N900 Router – My Dashboard

After logging into the router, you will be presented with the Dashboard view which you will see the overall view of the router network status.

There are 5 other tabs, Connect to Internet, Setup Wireless, Set up Storage, Add a Wi-Fi Device and Advanced Settings apart from the My Dashboard tab mentioned above. The only 2 tabs that probably interest you after you setup the router is Dashboard and Advanced Settings.

WD My Net N900 Router - Advanced Settings
WD My Net N900 Router – Advanced Settings

I wish there is a toggle for you to display the tabs under Advanced Settings as the main screen after you login once you setup the router.

I have no issues finding all my usual configurations (DHCP, wireless, admin credentials and port forwarding) under the Advanced Settings. In fact, I think it is more functionally organised than the Cisco Connect Cloud admin interface.

WD My Net N900 Router - DHCP
WD My Net N900 Router – DHCP

WD My Net N900 Router - Wireless
WD My Net N900 Router – Wireless

WD My Net N900 Router - Port Forwarding
WD My Net N900 Router – Port Forwarding

Do note that the router will logged you out of the admin interface if you are inactive for 10 minutes, which I think is irritating. The router should only log me out when I close the browser!

FasTrack/FasTrack Plus
Western Digital My Net router boosts their own Quality of Service (QoS) technology called FasTrack and FasTrack Plus. FasTrack is available for My Net N600 and N750 routers while FasTrack Plus is available with the N900 and N900 Central routers.

WD My Net N900 Router - FasTrack Plus
WD My Net N900 Router – FasTrack Plus

FasTrack is designed to allow the most popular streaming services (such as Netflix, HuluPlus, CinemaNow, Pandora, YouTube, Skype and Spotify) to use a pre-set configuration to optimize the quality of the stream. FasTrack automatically analyzes and prioritizes these services to ensure they get the proper bandwidth.

FasTrack Plus is designed to allow the WD router to do more than just recoginzing pre-configured services (like FasTrack does), or standard data packets (like traditional routers do). Instead, it instantly recognizes and prioritizes data for all videos, games and chat (voice and video) sessions on your network. A router with FasTrack Plus automatically allocates more bandwidth opening a wider lane for this type of service, while providing efficient bandwidth to all the other things happening on the network.

I am pretty impressed with the FasTrack technology when the WD guys demoed it to us during the launch event, one immediate thing you will notice when streaming 1080p movie from your network wirelessly is that there will be lesser buffering pauses.

I don’t think there is any disadvantage in leaving FasTrack switched on in your router settings.

Performance
Using LAN Speed Test v3.4.0, I tested the wired network transfer speed between my desktop and my NAS, Synology Disk Station DS210j, on RAID 1.

My house is wired using Cat6 network cables and my desktop computer and the NAS supports Gigabit connection.

As you can see on the screenshot below, the transfer speed between my computer and the NAS is about 8% slower at 28MB/s (write) and 40% slower at 34Mb/s (read) then the Linksys EA4500, which is pretty disappointing.

I don’t know whether is there a difference in benchmark calculation between LAN Speed Test v3.4.0 and LAN SpeedTest v2.0.8. However, a good thing to note is that the speed I gotten is almost the same as SmallNetBuilder’s review of the My Net N900.

NAS LAN Speed Test (Left: My Net N900, Right: EA4500)NAS LAN Speed Test (Left: My Net N900, Right: EA4500)
NAS LAN Speed Test (Left: My Net N900, Right: EA4500)

I am using WiFi Explorer on my MacBook Air to test the wi-fi signals at 2 of my favourite spot in my house.

  • MacBook Air (5GHz) – My Room: 64% (My Net N900) vs 65% (EA4500) vs 46% (DIR-855)
  • MacBook Air (2.4GHz)- My Room: 75% (My Net N900) vs 78% (EA4500 vs 80% (DIR-855)
  • MacBook Air (5GHz) – Toilet: 35% (My Net N900) vs 33% (EA4500) vs 31% (DIR-855)
  • MacBook Air (2.4GHz) – Toilet: 46% (My Net N900) vs 72% (EA4500) vs 56% (DIR-855)

The My Net N900 has slightly weaker wireless signal strength when compared with the EA4500, but I don’t think it makes much of a difference as a whole.

I am using Speedy Net for Mac to test the transfer speed between my MacBook Air and my Dad’s iMac. I managed to get 113Mbps when transferring from my MacBook Air (LAN) to my Dad’s iMac (Wireless) on 5GHz band. But for wireless transfer between the both computers on the same wireless settings, I got about 63Mbps. Comparing the performance with Linksys EA4500, I am getting 108Mbps and 65Mbps respectively.

MacBook Air (LAN) to iMac (Wireless) vs MacBook Air (Wireless) to iMac (Wireless)MacBook Air (LAN) to iMac (Wireless) vs MacBook Air (Wireless) to iMac (Wireless)
MacBook Air (LAN) to iMac (Wireless) vs MacBook Air (Wireless) to iMac (Wireless)

Summary
I would totally recommend the My Net N900 router because it is pretty affordable (SGD$239) for a high end model router. Most high end routers are in the range of SGD$279 to SGD$299. Also the My Net N900 has more LAN ports then a typical router which is useful for people with more wired computers (small office & some homes) as they do not need to get a separate 5-port switch which would cost an additional SGD$50 and another electrical power socket.

WD My Net N900 Has Replaced Linksys EA4500 Router In My House

If you want a more technical review on the My Net N900 router, checkout SmallNetBuilder.

Pros:

  • Competitively priced despite comparable performance with more expensive routers
  • 7x Gigabit LAN Ports
  • Built-in fan provides good air ventilation
  • 2x USB Ports with one of them being USB 3.0

Cons:

  • Ugly admin interface
  • Admin interface logs you out after 10 minutes of inactivity
  • Slow wired transfer speed

Synology DiskStation DS413j Review – Unboxing + Setup

$
0
0

I am being seeded the Synology DiskStation DS413j alongside with 3x WD Red 1TB hard disk drives for a 3 part review. For the first part, I will talk about the unboxing and setting up of the DS413j.

Since I only have 3x WD Red 1TB and the DS413j is a 4-bay NAS, I went to Sim Lim Square to get another WD Red 1TB so as not to let 1 of the bay goes to waste. I didn’t realized that WD Red 1TB is a pretty old HDD and most of the stores carry 2TB onwards. Luckily Bizgram still has some WD Red 1TB left. So I bought it for SGD$120.

My favourite store in Sim Lim Square, Fuwell, is selling the Synology DiskStation DS413j for SGD$660. They are also selling the WD Red 2TB for SGD$190 and WD Red 3TB for SGD$245 each. So a full 12TB NAS system will cost you SGD$660 + (4 * SGD$245) = SGD$1,640.

There will be 3 models to the DS413 series. The DS413j is the lowest end and is suitable for Home to Small Office, the DS413 is suitable for Home to Business Workgroup and the DS413+ which I am guessing will be out soon is suitable for Small and Medium Business.

Synology DiskStation DS413j is a budget-friendly 4-bay NAS server for small offices and home use, specifically designed to provide a solution for file storage and sharing with data protection for your home environment with low power consumption, quiet operation and reliability.

I am currently using the Synology DiskStation DS210j which I bought 3 years ago and still going strong!

Hardware Specifications

  • CPU Frequency: 1.6 GHz
  • Hardware Encryption Engine
  • Memory: DDR3 512 MB
  • Internal HDD/SSD: 4x 3.5″ or 2.5″ SATA II
  • Max Internal Capacity: 16 TB (4 X 4 TB HDD)
  • External HDD Interface: 2x USB 2.0 Port
  • Size (HxWxD): 184 x 168 x 230 mm
  • Weight: 2.23 kg
  • LAN: 1x Gigabit Port (Supports Wake on LAN/WAN)
  • Wireless Support (dongle)
  • System Fan: 2x 80mm x 80mm
  • Supported RAID Type : Synology Hybrid RAID, Basic, JBOD, RAID 0, RAID 1, RAID 5, RAID 5+Spare, RAID 6, RAID 10

For the full specifications, check out the official site.

Synology DiskStation DS413j

Unboxing

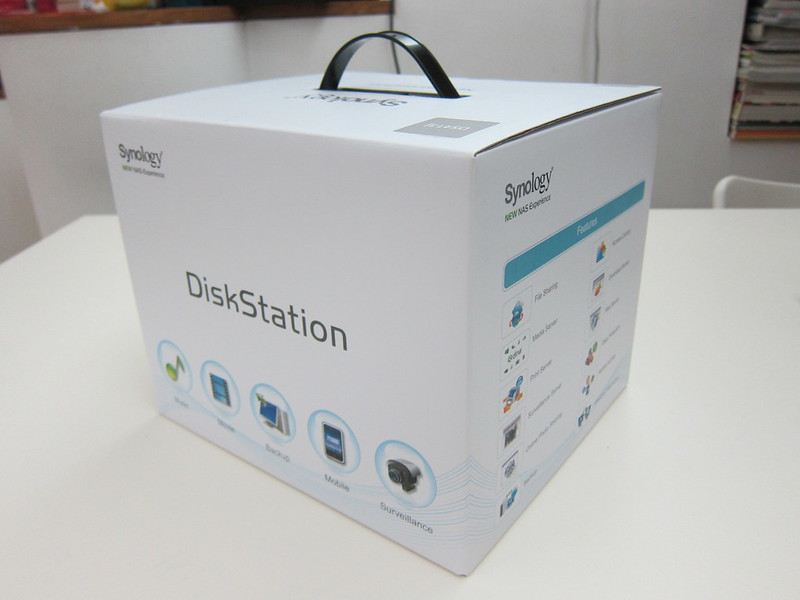
DS413j - Box
DS413j – Box

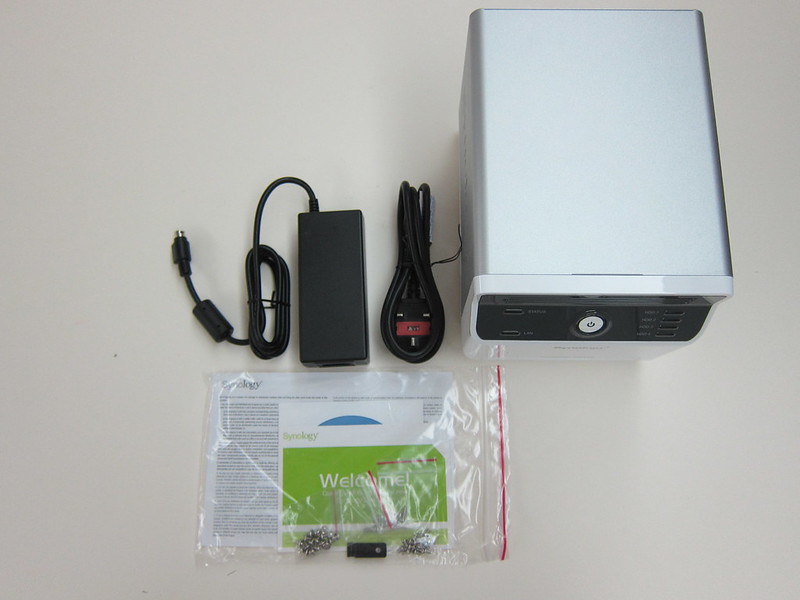
DS413j - Box Contents
DS413j – Box Contents

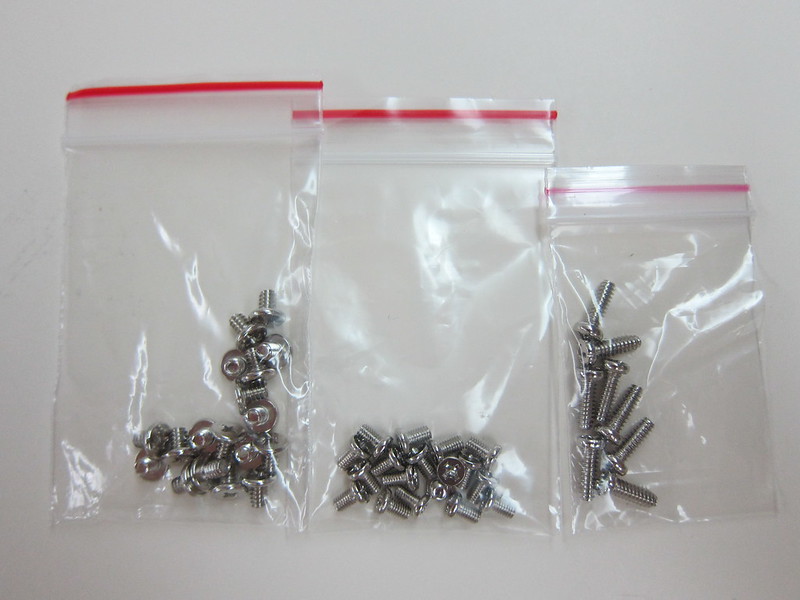
DS413j - Screws Provided
DS413j – Screws Provided

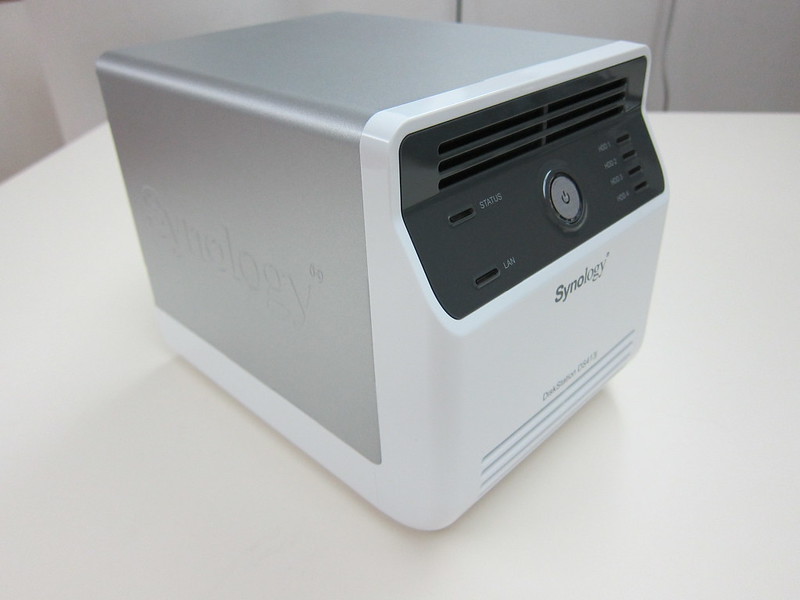
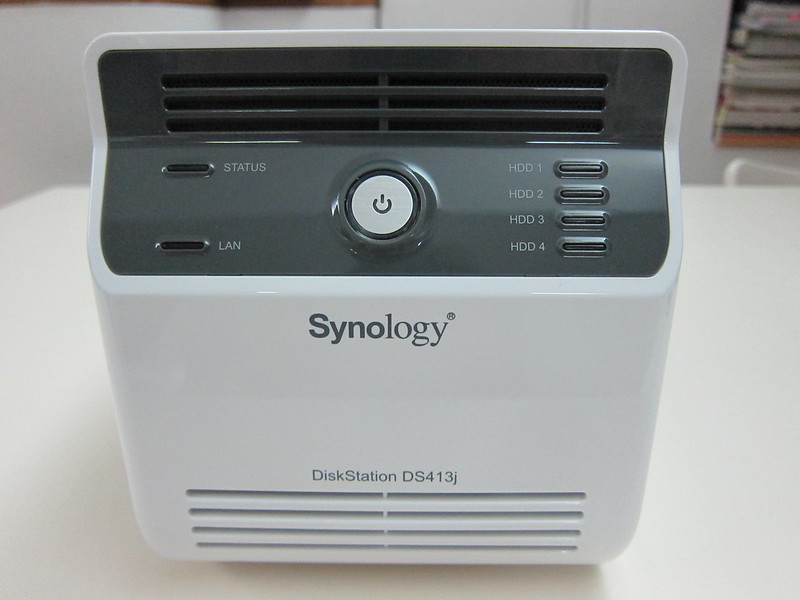
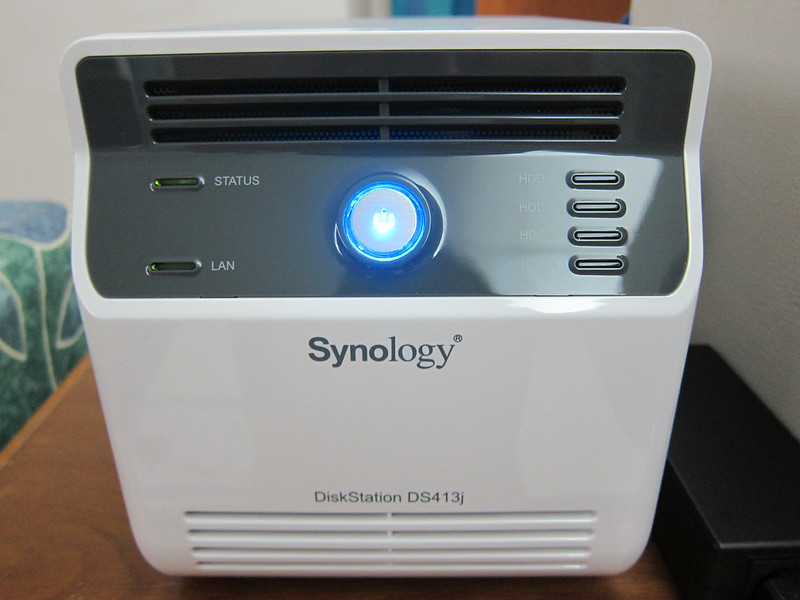
DS413j - Front View
DS413j – Front View

On the front, you will see all the light indicators. The status, LAN and 4 HDD indicators will be in green while the power indicator is in blue. I do not know whether it is the design of the DS413j or the light bulb used, but it seems that the indicators are less glaring compared to my existing DS210j.

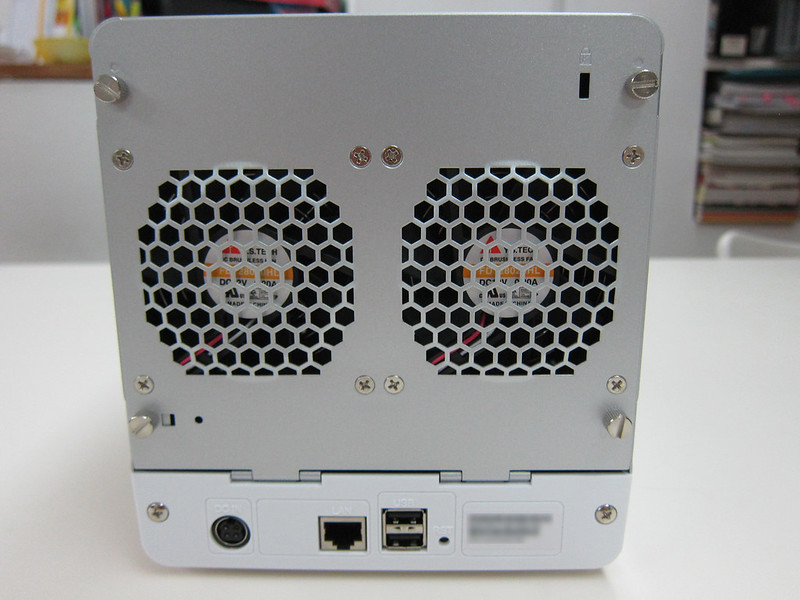
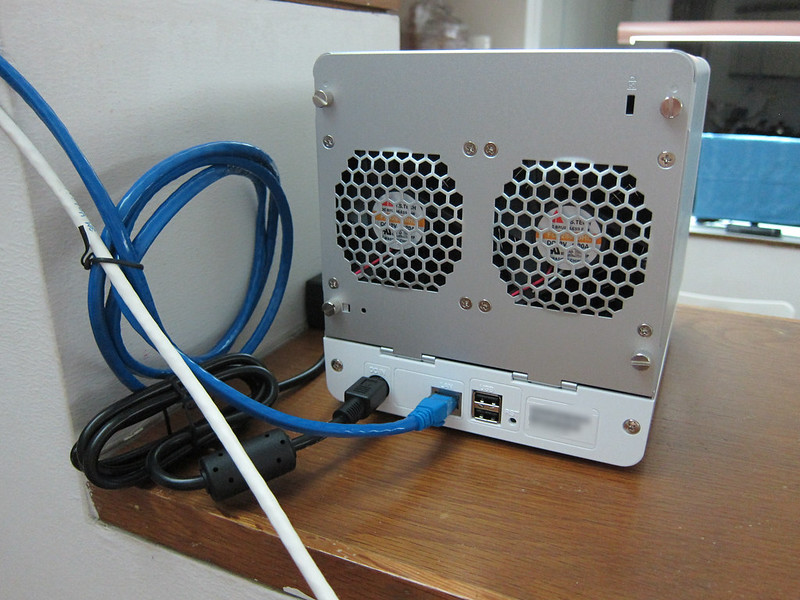
DS413j - Back View
DS413j – Back View

At the back houses the power port, gigabit port, 2x USB 2.0 port, reset button and 2x 80mm x 80mm fan. On my DS210j, the LAN port itself has an activity light indicator, but it is not present in this DS413j.

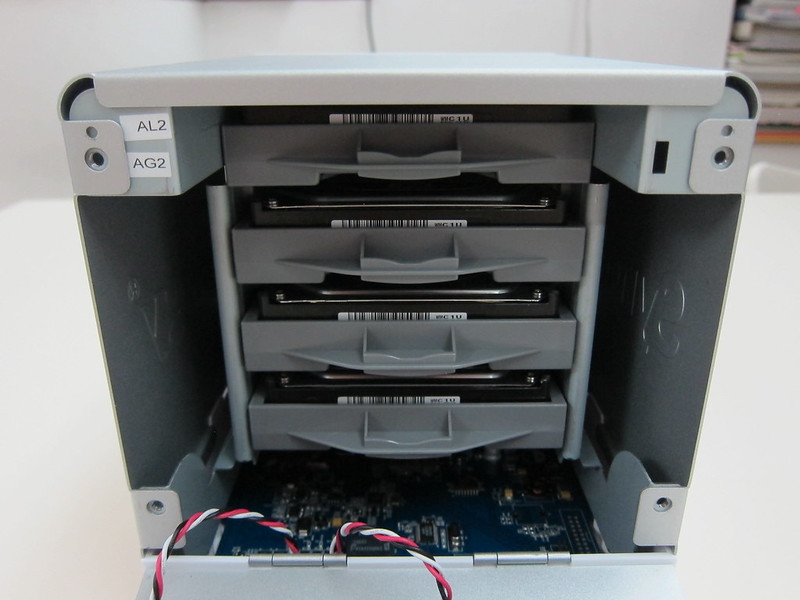
Installing The HDD

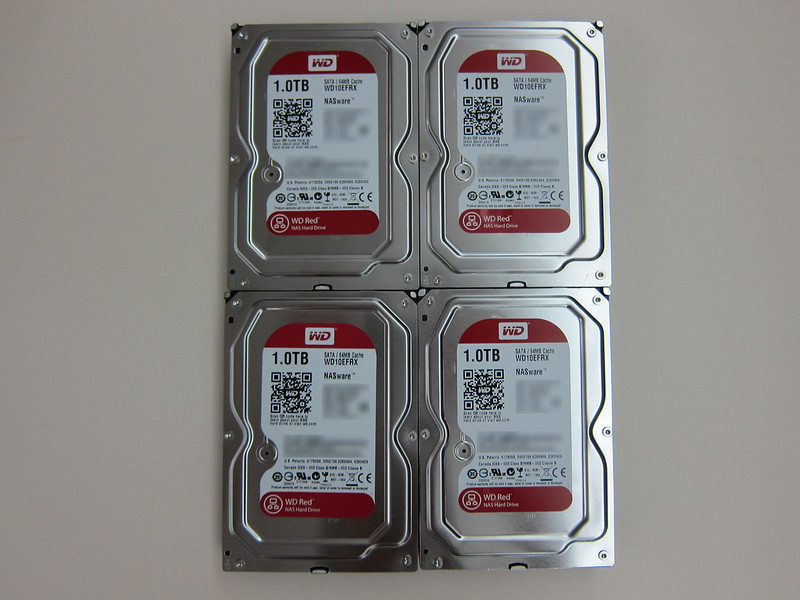
4x WD Red 1TB
4x WD Red 1TB

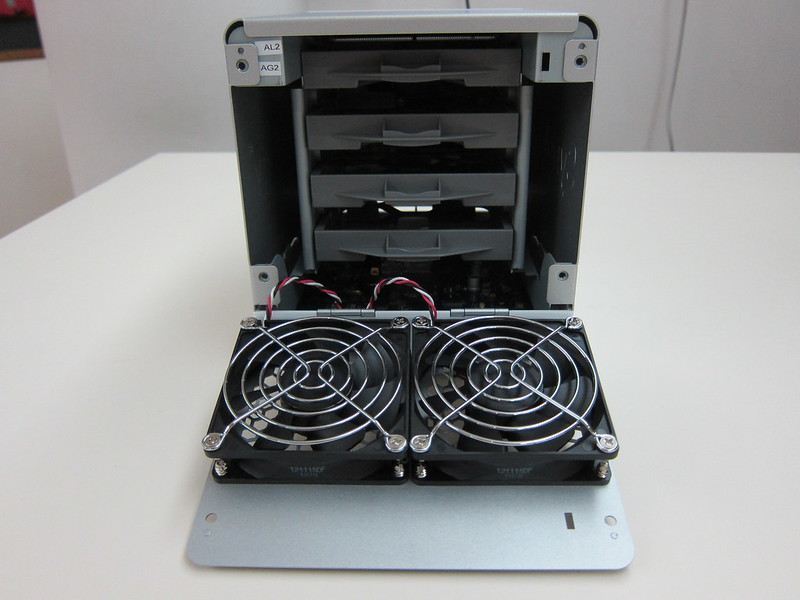
DS413j - Opening The Back
DS413j – Opening The Back

DS413j - Drive Bays
DS413j – Drive Bays

DS413j - Removing The Cover
DS413j – Removing The Cover

DS413j - Mounting The WD Red 1TB On The Drive Bay
DS413j – Mounting The WD Red 1TB On The Drive Bay

DS413j - Use 4 Screws On Each Bay
DS413j – Use 4 Screws On Each Bay

DS413j - Put The Drives Back In
DS413j – Put The Drives Back In

Setup

DS413j - Plugged In LAN & Power Cable
DS413j – Plugged In LAN & Power Cable

DS413j - Power Up
DS413j – Power Up

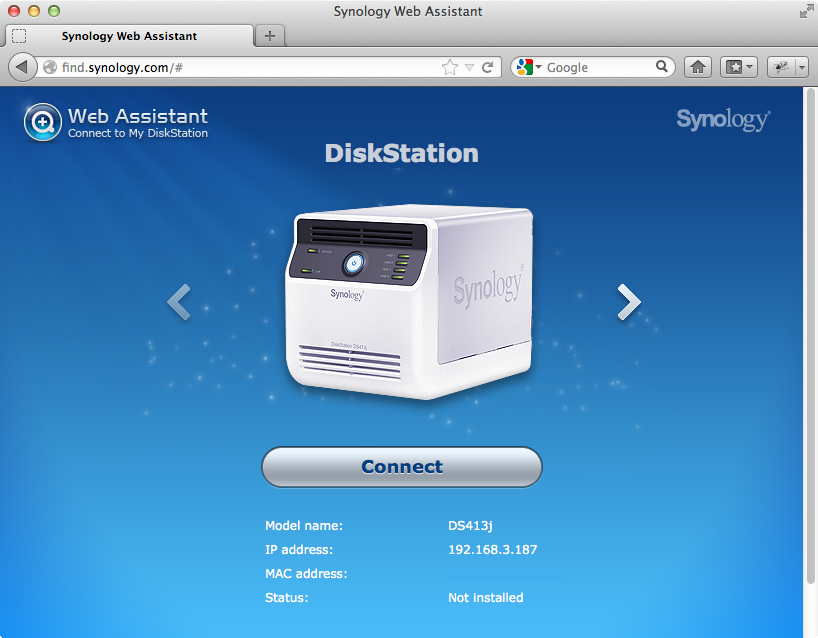
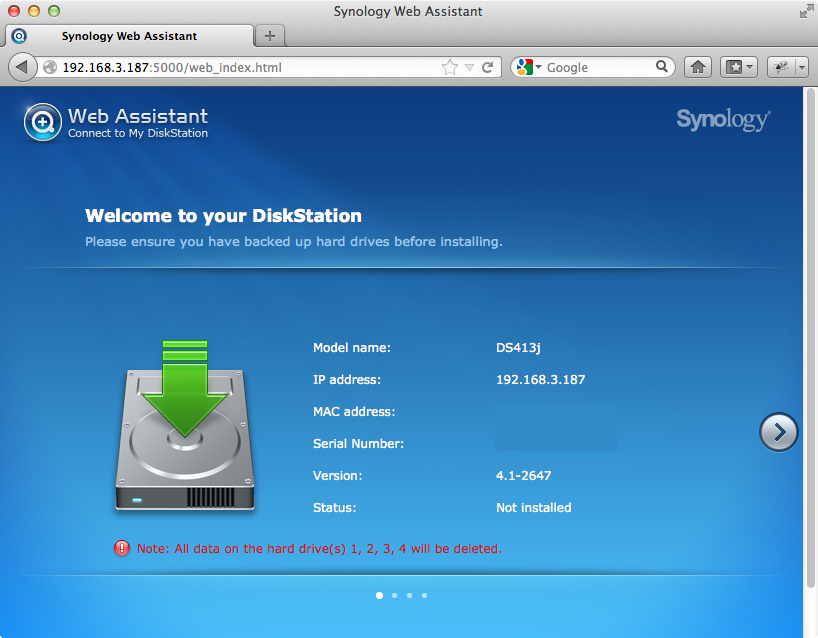
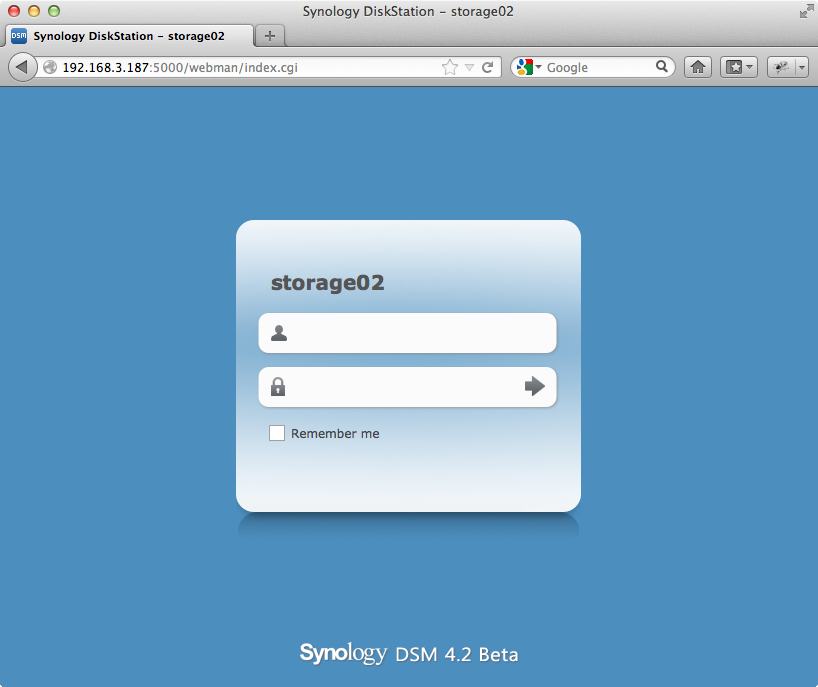
After powering up the DS413j, just point your browser to find.synology.com and it will automatically detect your DS413j within your network and follow the instructions in your browser to get it set up!

Step 1
Step 1

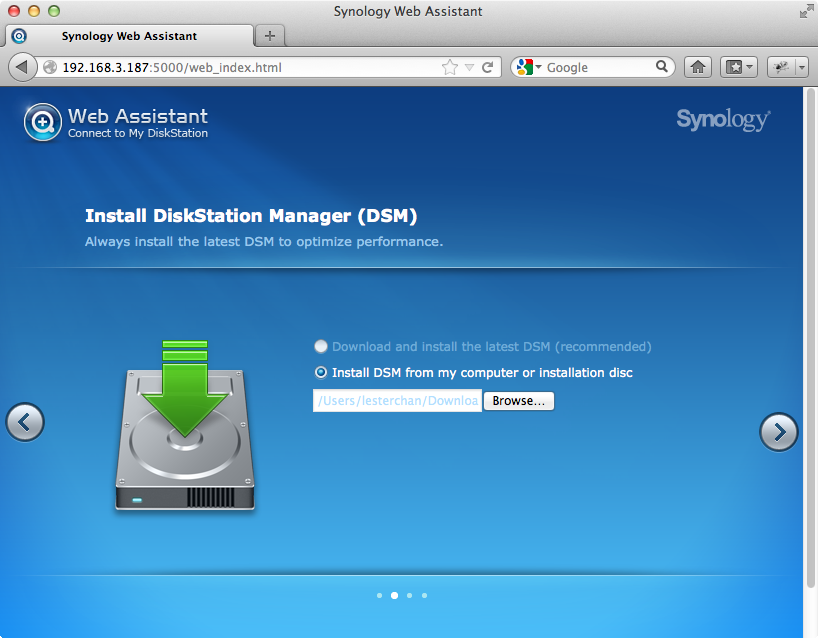
Step 2
Step 2

Step 3
Step 3

For step 3, since I am testing the latest DSM 4.2 Beta (OS that is powering the DS413j), I chose “Install DSM from my computer or installation disc”. For most users, you would normally choose the first option. However, if you have a slow Internet connection, choose “Install DSM from my computer or installation disc” and use the disc that is provided with the DS413j. Inside it contains DSM 4.1.

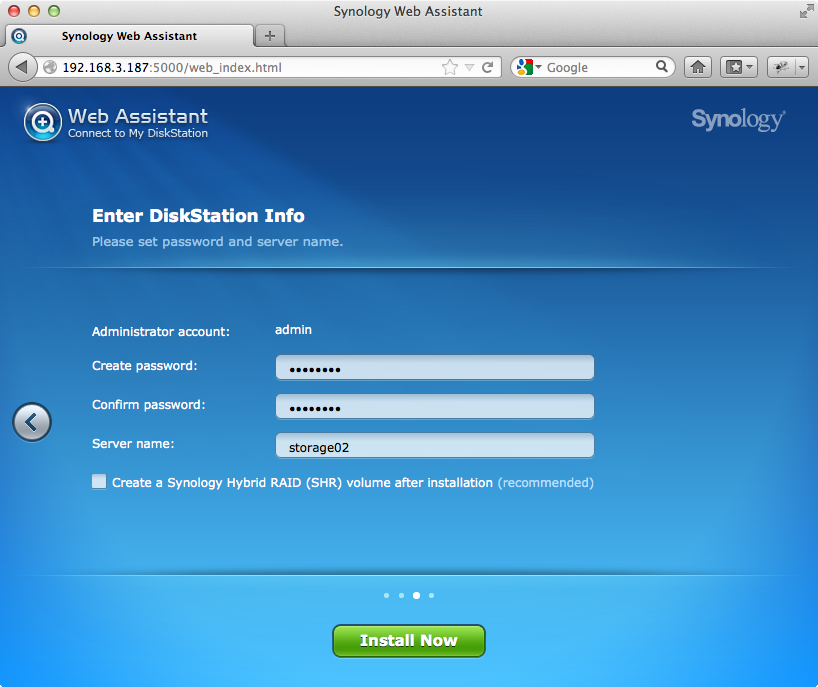
Step 4
Step 4

For Step 4, do remember to check the “Create a Synology Hybrid RAID (SHR) volume after installation”. The reason I did not check on it initially is because I wanted to use RAID 5 instead of SHR.

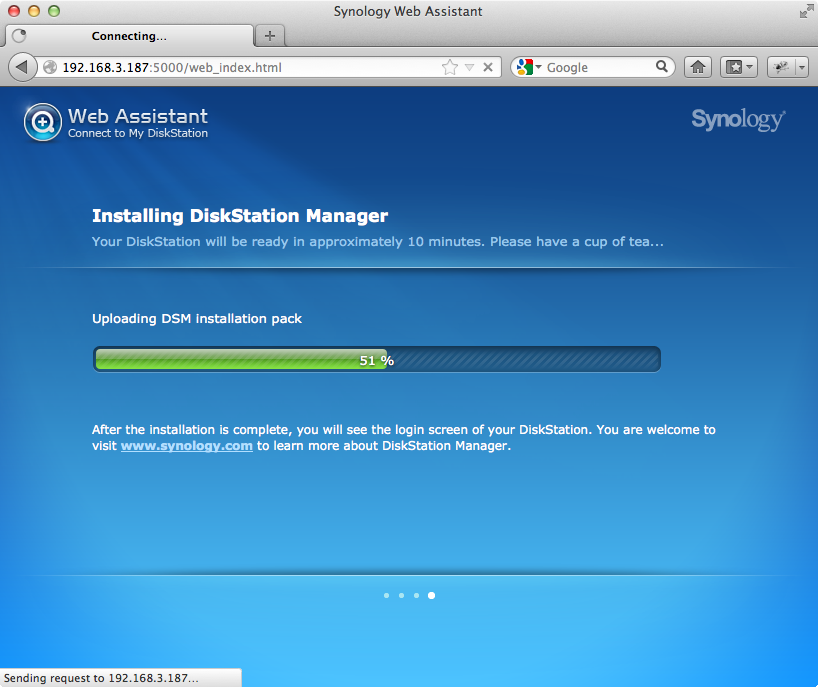
Step 5
Step 5

After about 5 minutes you will be redirected to the login screen.

Step 6
Step 6

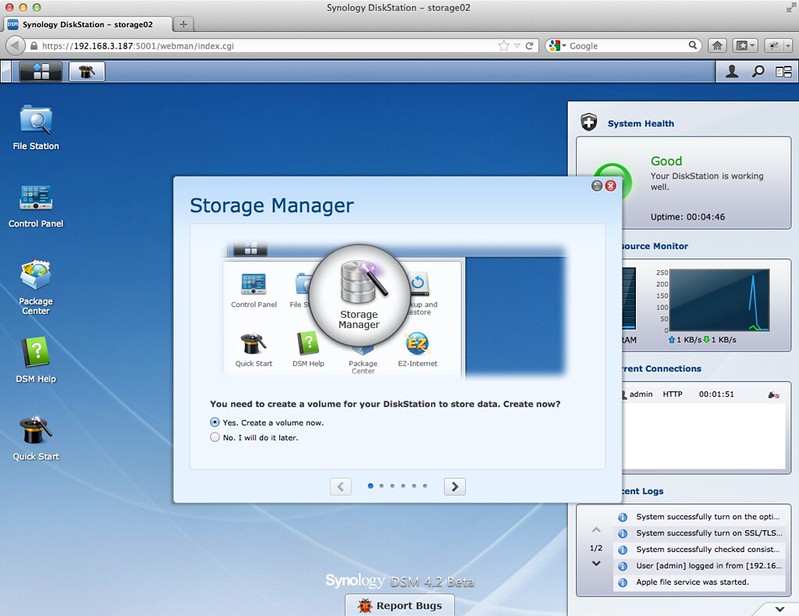
After logging in, I was prompted to create a volume and after one big round as mentioned in Step 4, I still decided to give SHR a try.

Step 7
Step 7

Step 8 - Final Step
Step 8 – Final Step

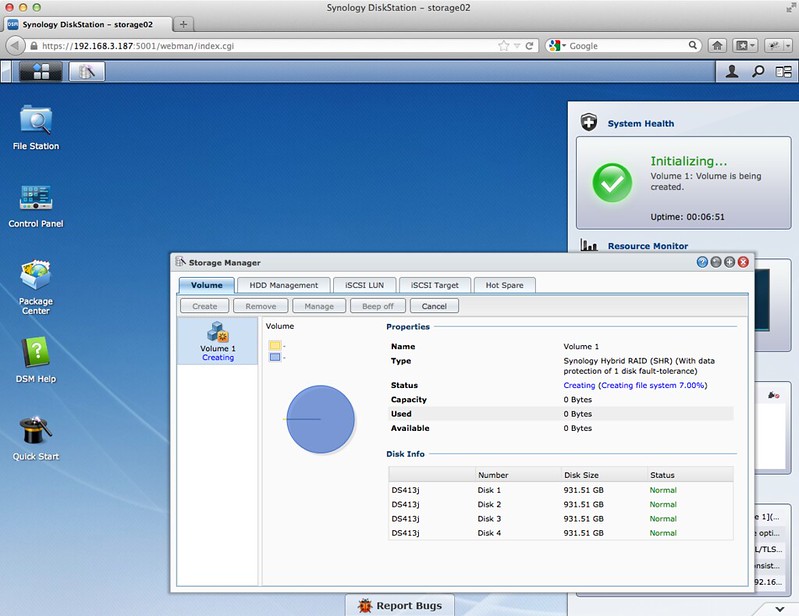
It will take about 15 minutes to setup the volume but after setting up the volume, it will run a parity check which will take about 8 hours.

Choosing Your RAID Type
Depending on which RAID type you choose, you will get different storage capacity vs redundancy for your NAS. You will have to weigh a balance and choose one that suits your data storage. For me, if I am going to store my personal documents, photos and videos in my primary NAS, I will go for RAID 10 as redundancy is more important than space. However, if I am going to use it for media streaming and storage, I will go for SHR or RAID 5 as space is important but there is still some basic redundancy.

So you might be wondering how is SHR (Synology Hybrid RAID) different from the traditional RAID?

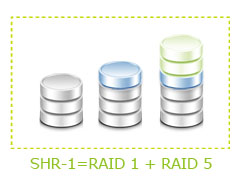
SHR is a proprietary automated RAID management system from Synology which is based on the Linux RAID management system. For traditional RAID system, typically all the hard disk drives needs to be from the same manufacturer and have the same capacity. But for SHR, it supports different capacity hard disk drives. So if you started with 4x 1TB drives and if one of them fail, you can always swap the failed 1TB drive with a greater capacity one like a 3TB drive. Also if you run out of space in your NAS, you can always swap your existing 1TB HDD with a 3TB HDD (one at a time) and SHR will automatically expand the volume. Do note that expanding a volume will take a lot of time, so plan ahead and do consider this in your budget as well. For more details, do checkout What is Synology Hybrid RAID.

Synology has an awesome interactive RAID calculator which helps you calculate how much space you will have in your NAS depending on which RAID type you choose.

Here is a table comparing different RAID types taken from Synology RAID Calculator:

SHR SHR (Synology Hybrid RAID)

Minimum HDD required: 2 (with data protection)

Pros: 1 HDD redundancy & optimized volume size. Best used when combining hard disks of varying sizes.

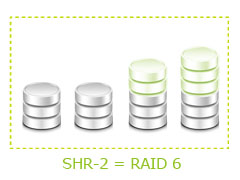
SHR-2 SHR-2 (Synology Hybrid RAID)

Minimum HDD required: 4

Pros: 2 HDD redundancy & optimized volume size. Best used when combining hard disks of varying sizes.

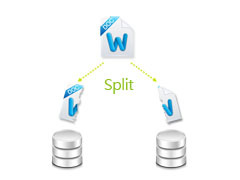
RAID 0 RAID 0

Minimum HDD required: 2

Pros: Data is divided into equal shares and written into the hard disks. Data access is quicker and more efficient.

Cons: If one drive fails, all data is lost and you must restore from additional backup.

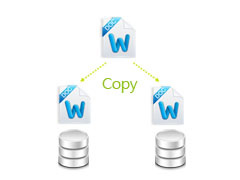
RAID 1 RAID 1

Minimum HDD required: 2

Pros: The same data is mirrored to all HDDs. If one drive fails, data integrity will not be affected.

Cons: The available volume is limited to the storage capacity of one HDD.

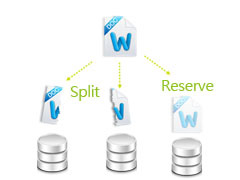
RAID 5 RAID 5

Minimum HDD required: 3

Pros: It offers 1 HDD redundancy. Data is striped across multiple disks with a parity check bit to the data. If one drive fails, the parity check bit will ensure data integrity.

Cons: The storage capacity of 1 drive is reserved for data integrity check and therefore slightly affects the available volume size.

RAID 6 RAID 6

Minimum HDD required: 4

Pros: It offers 2 HDD redundancy. Data is striped across multiple disks with a parity check bit to the data. The parity check bit ensures data integrity.

Cons: The storage capacity of 2 drives are reserved for data integrity check and therefore slightly affects the available volume size.

RAID 10 RAID 10

Minimum HDD required: 4, the number must be even

Pros: It offers the benefit of both RAID 0 and RAID 1 – data access efficiency and mirroring protection.

Cons: The available volume is half of the total HDD storage capacity.

To Be Continued …
For the second part of the review, I will do a basic benchmark, talk about network backup and CloudStation. So stay tuned!

Recap

Synology DiskStation DS413j Review – Performance, Backup & CloudStation

$
0
0

In the first part review of the Synology DiskStation DS413j, I talked about unboxing and setting up and in this second part review, I will talk about the performance, backup and CloudStation.

Performance

DS413j - LAN Speed TestDS210j - LAN Speed Test
LAN Speed Test (DS413j Left vs DS210j Right)

Tested the file transfer speed using LAN Speed test. The DS413j is on SHR with WD Red and the DS210j is on RAID 1 with WD Green. When I am doing the test, I also notice that the DS413j with WD Red is extremely quiet unlike the DS210j on WD Green which makes slightly more noise, but it is still acceptable.

Backup
I am still currently using the Synology DiskStation DS210j which is on 2x WD Green 1TB running on RAID 1. It is possible from one Synology NAS to backup to another Synology NAS via it’s Network Backup feature.

There are a few types of backup options that are available in the Server Backup feature:

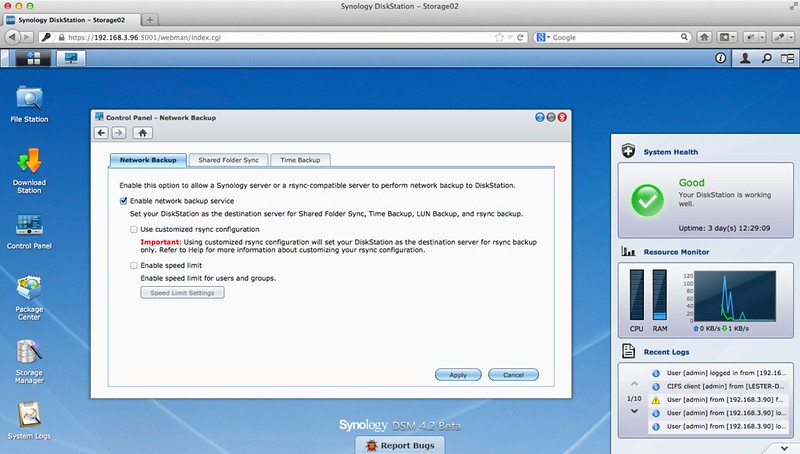
  • Network Backup
    Network Backup allows you to back up data from one Synology DiskStation to another one, including rsync compatible server, over the network. Encryption and compression makes a backup task safe and efficient. You can also block-level backup, so that only the changed files will be processed to save network bandwidth.
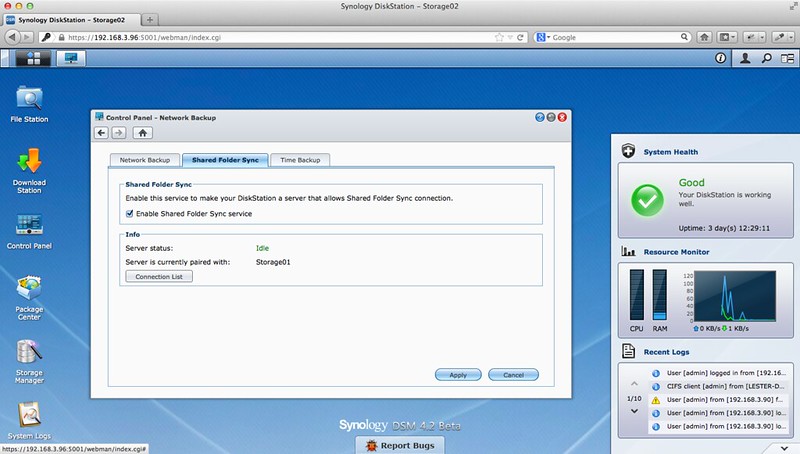
  • Shared Folder Sync
    Shared Folder Sync allows users to synchronize specific folders from multiple servers to a single destination server in real-time. Branch offices will be able to share documents with headquarter seamlessly and safely with encrypted folder protection. The disaster recovery time can be greatly minimized when your source DiskStation experiences failure, and in turn it can ensure maximum service uptime.
  • Time Backup
    Time Backup is a unique backup application that comes with snapshot, multiple backup versions, and smart recycle that keeps storage space from filling up. With an intuitive interface, backing up and restoring files is effortless. You can either back up files from one shared folder to another shared folder, or from one DiskStation to another DiskStation.
  • Local Backup
    You can create multiple volumes to place your data, you can always backup important data from between two volumes – from one shared folder to another shared folder. You can also back up data to an external storage device, such as a USB/eSATA hard drive.
  • Amazon S3 Backup
    Synology also allows business users to back up data from DiskStation to their Amazon S3 cloud storage account. So use Amazon S3 storage space as a backup to your DiskStation or treat it like a contingency site should anything happens to the data.

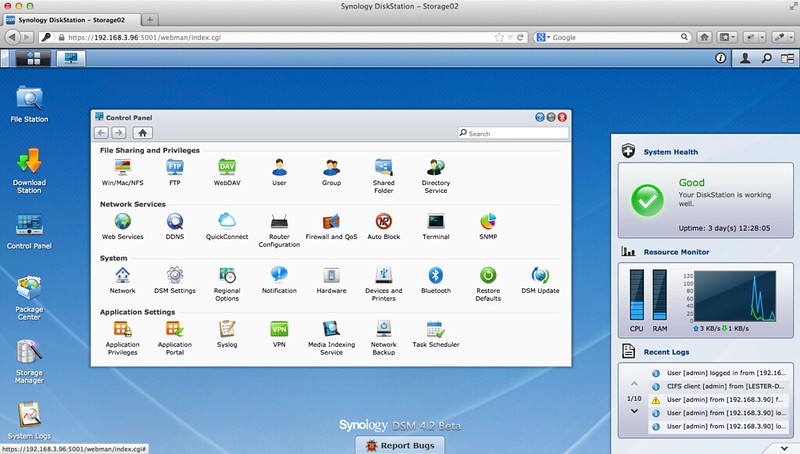
To enable Network Backup and/or Shared Folder Sync, just login to DSM and go to “Control Panel -> Network Backup” as shown in the screenshots below.

DS413j - Control Panel
DS413j – Control Panel

DS413j - Enable Network Backup
DS413j – Enable Network Backup

DS413j - Enable Shared Folder Sync
DS413j – Enable Shared Folder Sync

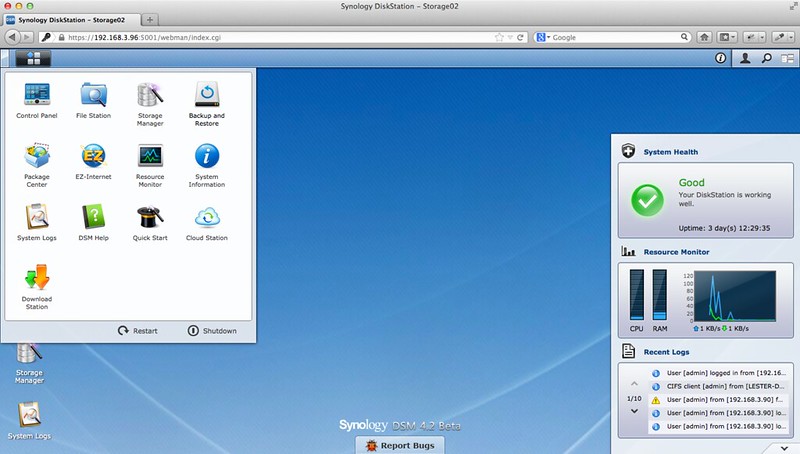
To access your Backup & Restore tasks, click on the “Apps” icon at the top menu bar and choose “Backup and Restore”.

DS413j - Backup & Restore
DS413j – Backup & Restore

Backup – Shared Folder Sync
The difference between Shared Folder Sync and Network Backup is Shared Folder Sync will propagate changes in both ways (source < -> destination) while Network Backup will only propagate changes from a source to a destination (source -> destination).

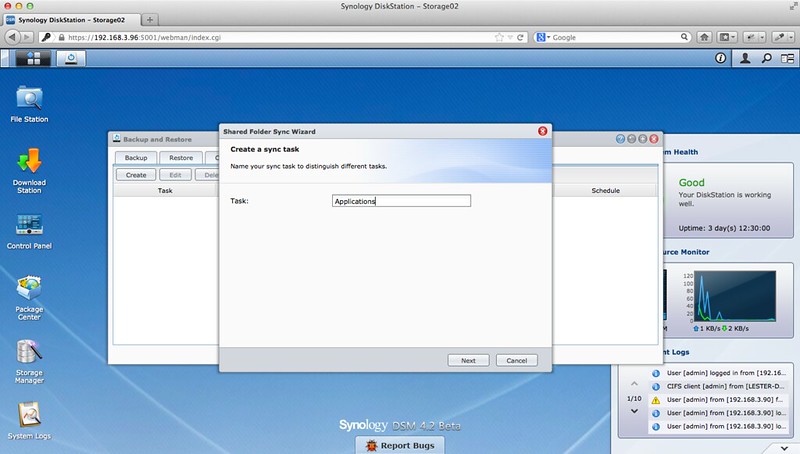
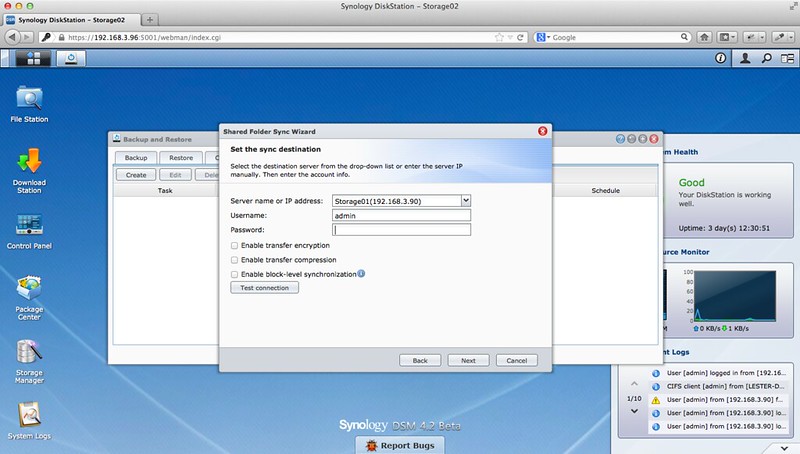
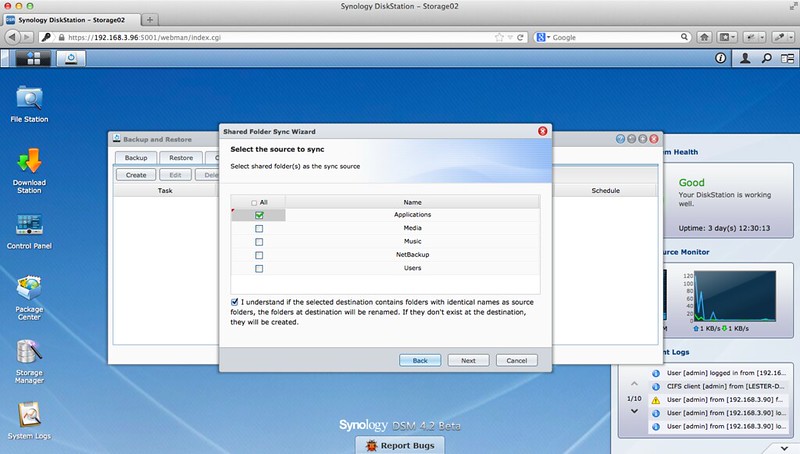
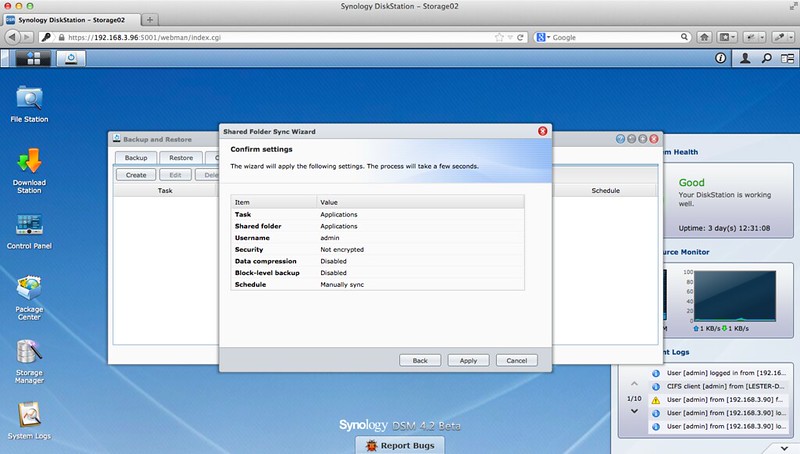
To create a Shared Folder Sync, go to “Apps -> Backup and Restore -> Shared Folder Sync Tab”.

I would recommend Shared Folder Sync if you are using two Synology NAS which is not physically located together. A use case for me is when I moved out to my own house sometime in 2016, I will get another Synology NAS and setup Shared Folder Sync to sync data back to my Synology NAS at my parents’ place. In this way, regardless of whether I am at my own house or at my parent’s place, I can always access the data.

In terms of the freshness of the data, it depends on what you set for the sync schedule. I would recommend choosing “Run sync on modification” if you need the data in real time. But I personally prefer to choose “Run sync every 1 hour” to avoid too much network/file overhead. The 1 hour is derive from the time taken to travel from my place to my parents’ place.

Shared Folder Sync - Step 1
Shared Folder Sync – Step 1

Shared Folder Sync - Step 2
Shared Folder Sync – Step 2

Shared Folder Sync - Step 3
Shared Folder Sync – Step 3

Shared Folder Sync - Step 4
Shared Folder Sync – Step 4

Shared Folder Sync - Step 5
Shared Folder Sync – Step 5

Shared Folder Sync - Step 6 (Done)
Shared Folder Sync – Step 6 (Done)

Backup – Network Backup
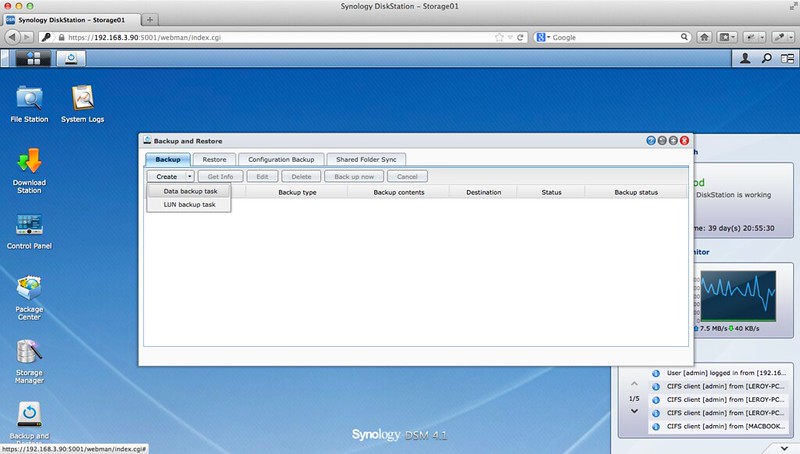
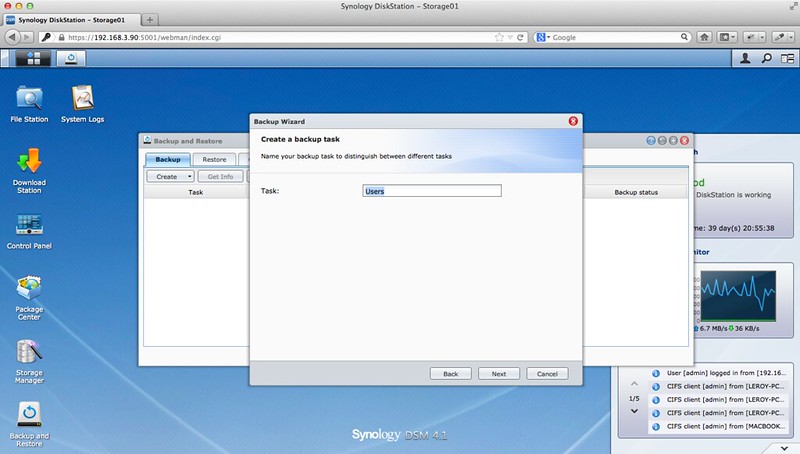
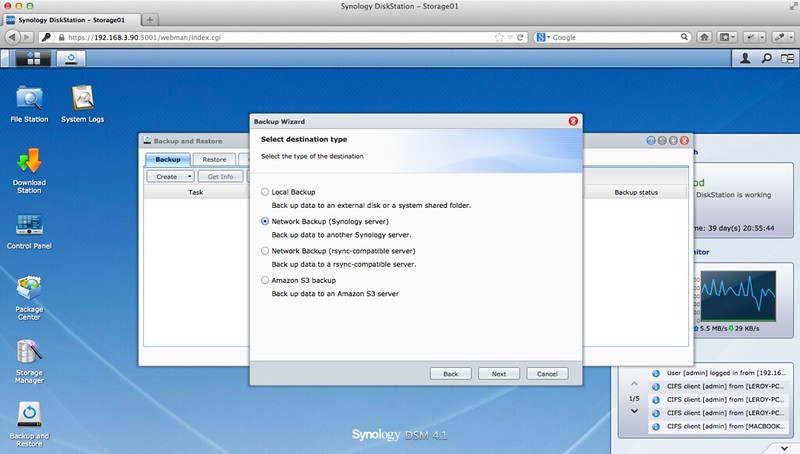
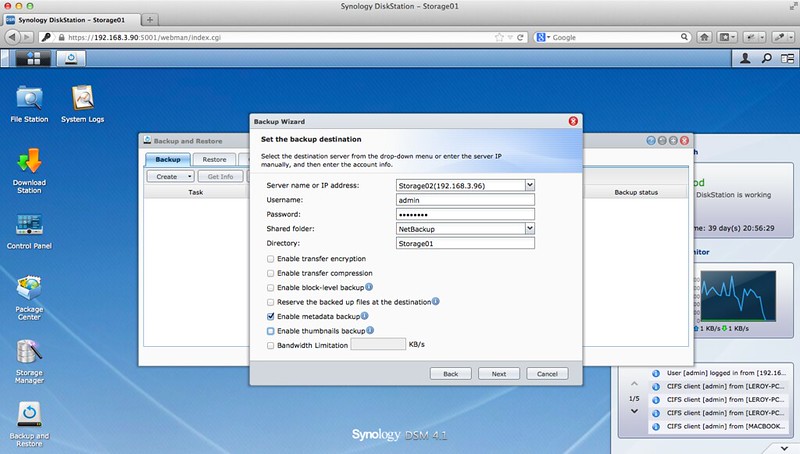
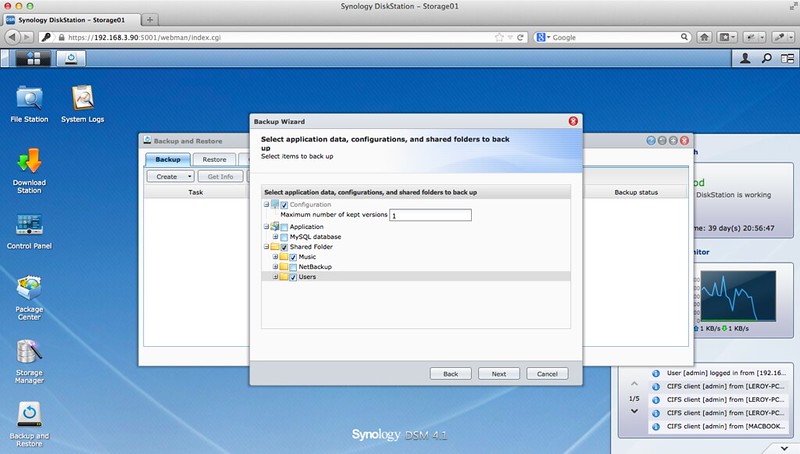
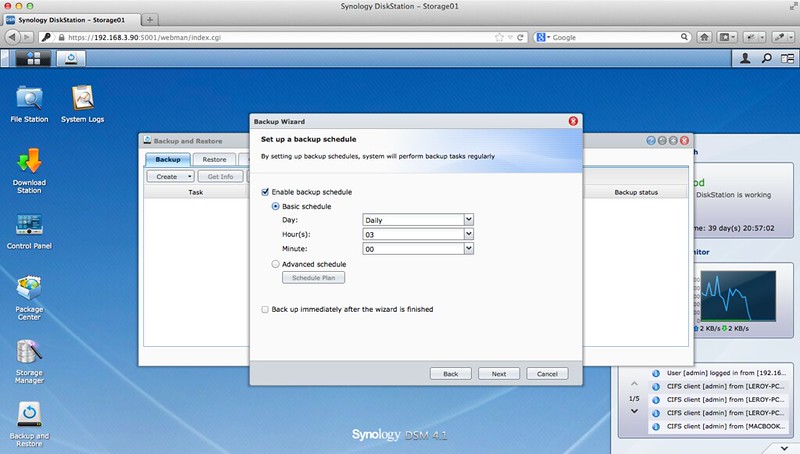
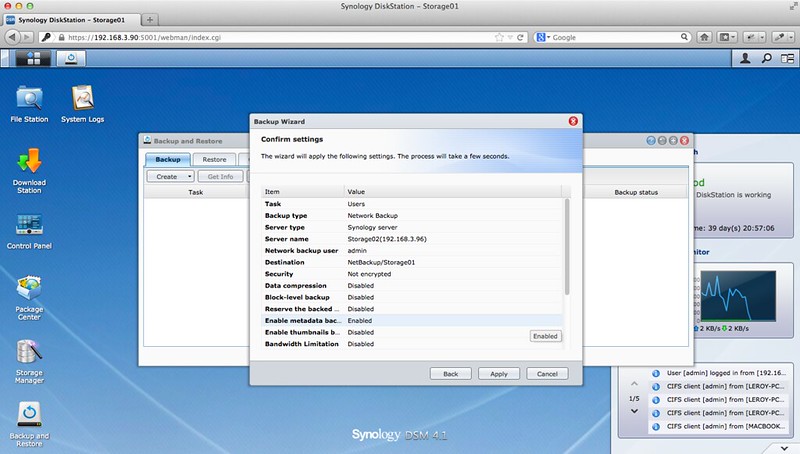
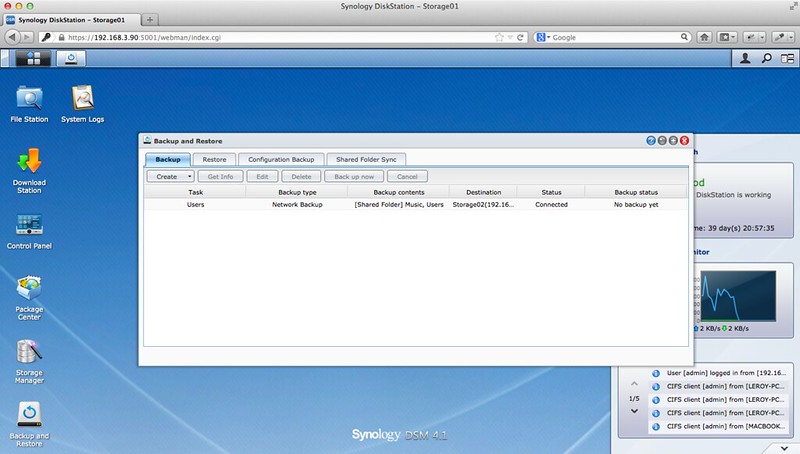
To create a Shared Folder Sync, go to “Apps -> Backup and Restore -> Backup Tab”.

I would recommend Network Backup if you have two Synology NAS which is physically located together. Like in my case I am placing the DS413j besides my DS210j and my primary NAS is the DS210j. I only open and save documents with my primary NAS which is already on RAID 1, and thus having the data available in real time for both NAS is not needed.

The reason I am using the Network Backup on a daily basic is just in case both my hard disk in my DS210j fails at the same time.

Network Backup - Step 1
Network Backup – Step 1

Network Backup - Step 2
Network Backup – Step 2

Network Backup - Step 3
Network Backup – Step 3

Network Backup - Step 4
Network Backup – Step 4

Network Backup - Step 5
Network Backup – Step 5

Network Backup - Step 6
Network Backup – Step 6

Network Backup - Step 7
Network Backup – Step 7

Network Backup - Step 8 (Done)
Network Backup – Step 8 (Done)

Cloud Station
Synology’s Cloud Station is like your personal Dropbox on your Synology NAS. For those unaware, Dropbox is a file hosting service that offers cloud storage and file synchronisation with your computer/devices. Dropbox is great but some people might have second thoughts about storing confidential files on third party servers But with Cloud Station, the files will be stored in your Synology NAS which you own.

To make Cloud Station seamlessly sync files from your computer to the Synology NAS and vice versa over the Internet, it makes use of QuickConnect to remove the hassle of configuring any port forwarding.

QuickConnect is a relay service that can help you set up Cloud Station syncing easily without configuring port forwarding rules for your DiskStation.

Of course if you are an advanced user, you can configure your own port forwarding. In fact if you would like to sync files between 3 or more computers, it is recommended to set up port forwarding rules for better performance. By default, Cloud Station uses TCP port 6690.

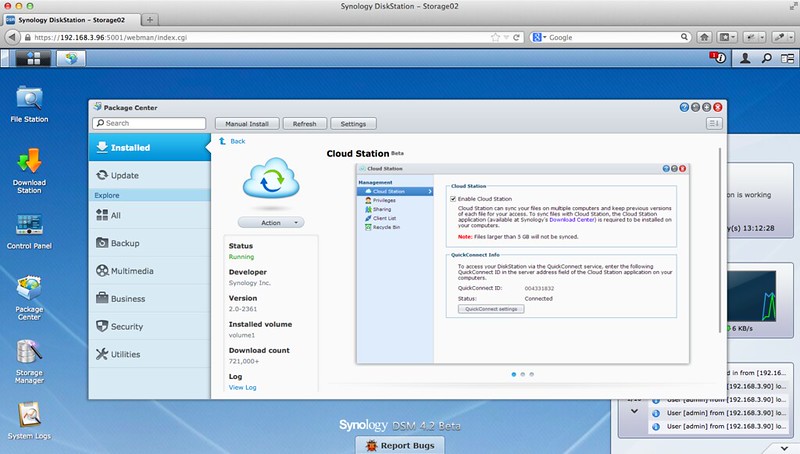
You can install Cloud Station via the Package Center.

Cloud Station - Install via Package Center
Cloud Station – Install via Package Center

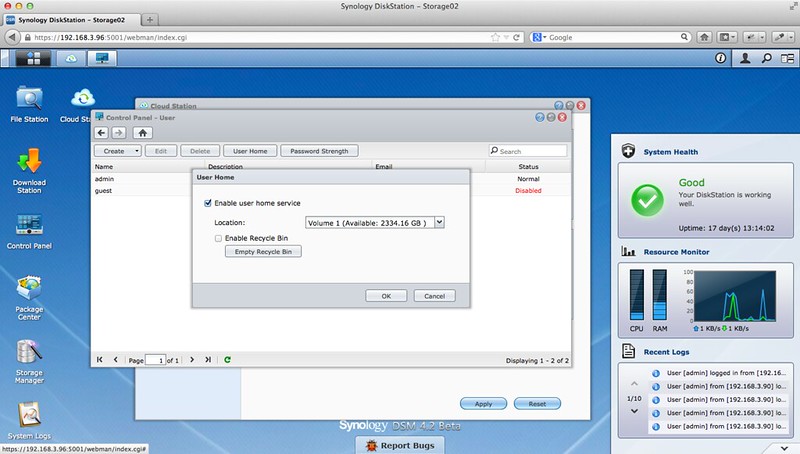
After installation, you need to enable User Home Service (Control Panel -> User -> User Home Tab -> Enable user home service).

Cloud Station - Enable User Home Service
Cloud Station – Enable User Home Service

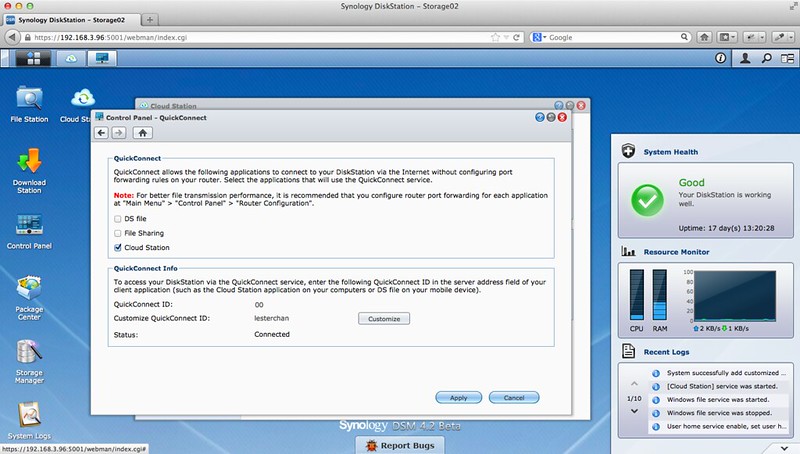
Once that is done you can proceed on to setup your QuickConnect (Control Panel -> Quick Connect). By default your Quick Connect ID will be numeric, however you can customize it to uniquely identify your Synology NAS (in my example I am using lesterchan).

Cloud Station - QuickConnect
Cloud Station – QuickConnect

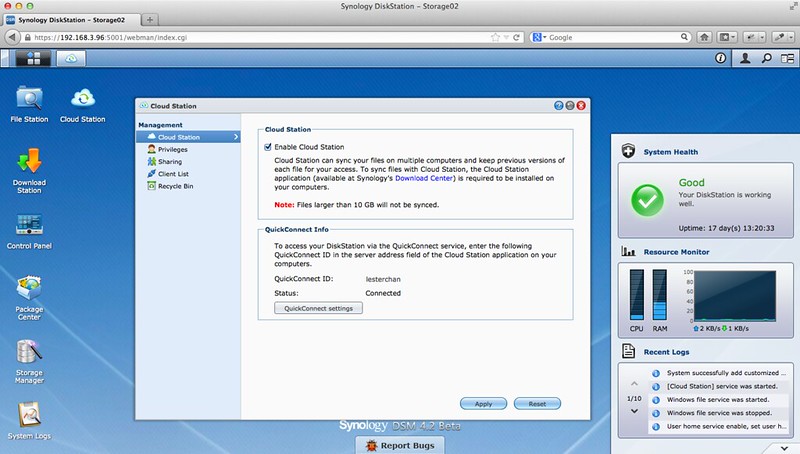
And you are almost done!

Cloud Station
Cloud Station

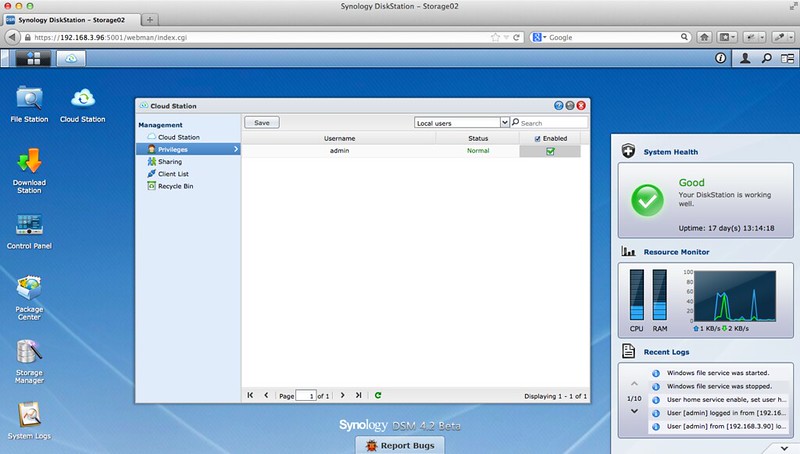
Remember to go to Cloud Station -> Privileges and check the boxes of those users that is allowed to sync files using Cloud Station!

Cloud Station - Privileges
Cloud Station – Privileges

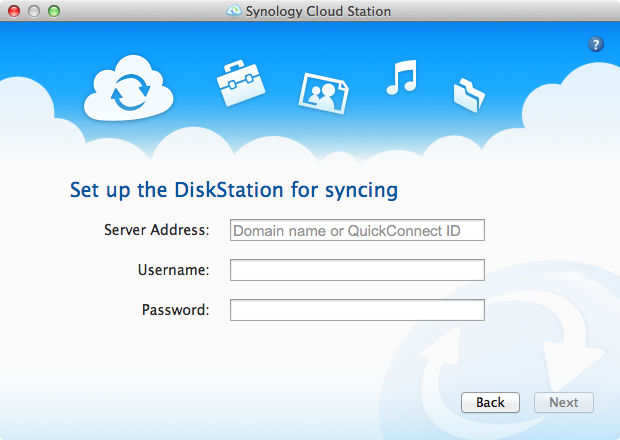
Next, we need to install the Cloud Station client on your computer for it to sync the files to the NAS. You can download the client from Synology Download Center. Right now only Windows and Mac are supported.

Cloud Station Client - Step 1
Cloud Station Client – Step 1

Cloud Station Client - Step 2
Cloud Station Client – Step 2

Cloud Station Client - Step 3
Cloud Station Client – Step 3

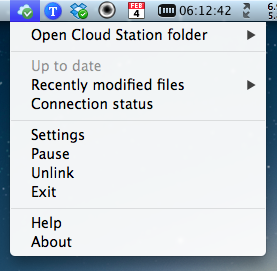
Cloud Station Client - Status
Cloud Station Client – Status

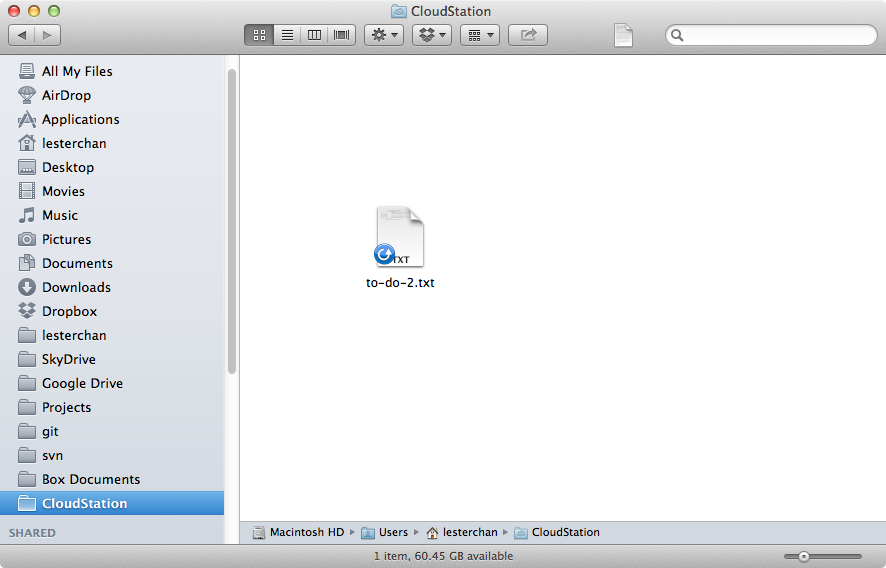
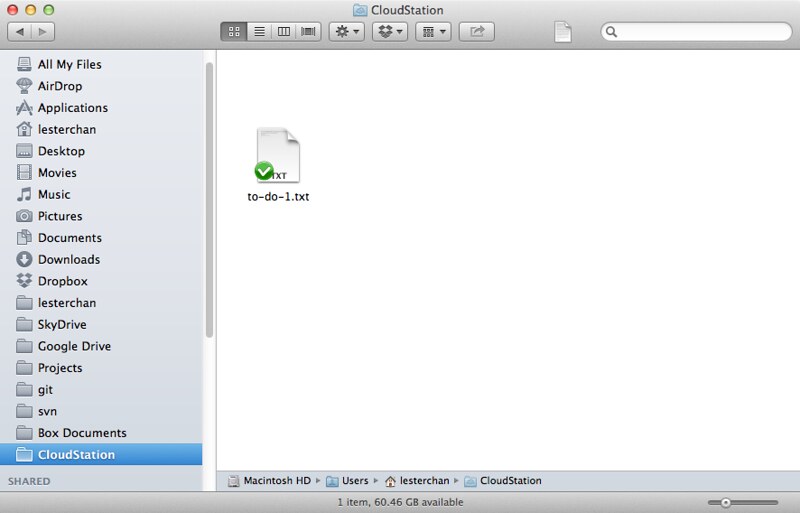
Syncing files is extremely easy, a folder called “Cloud Station” will be created in your home directory in your computer, if you copy and files or folders to it, it will have a “blue sync” icon overlaid on it and once the file has been synced to your Synology NAS, it will have a “green tick” icon as shown below. You can treat the “Cloud Station” folder like any other ordinary folder.

Cloud Station Client - Syncing Files
Cloud Station Client – Syncing Files

Cloud Station Client - Sync Done
Cloud Station Client – Sync Done

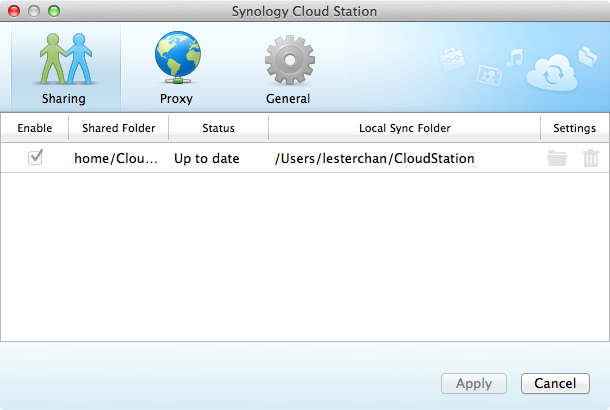
Cloud Station Client - Settings (Sharing)
Cloud Station Client – Settings (Sharing)

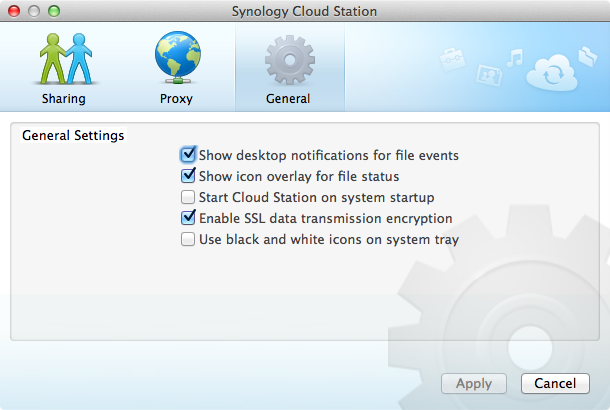
Cloud Station Client - Settings (General)
Cloud Station Client – Settings (General)

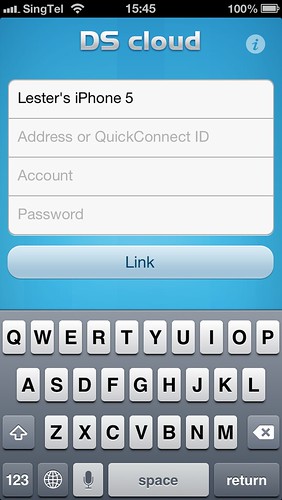
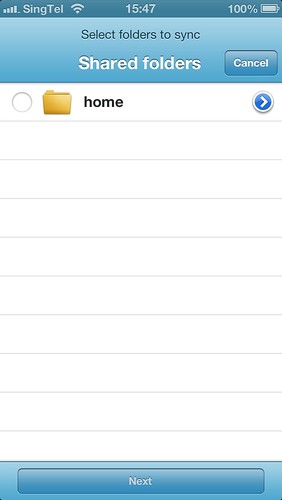
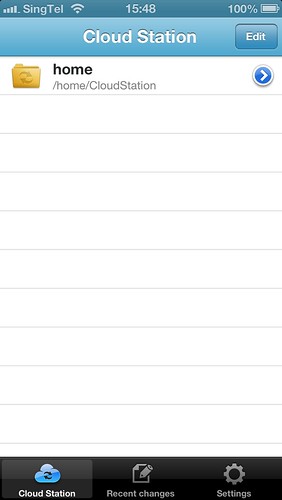
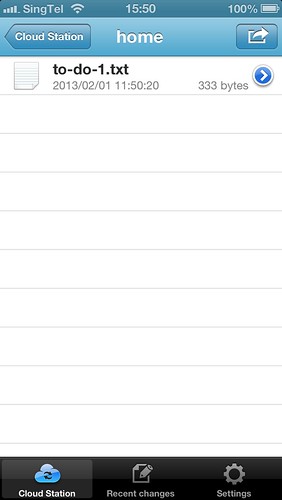
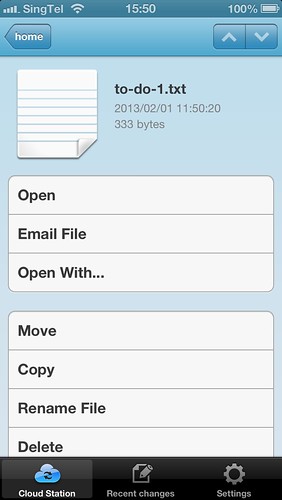
Cloud Station also has a native app called DS cloud for both iOS and Android.

Cloud Station iOS App - Setup   Cloud Station iOS App - Setup
Cloud Station iOS App

Cloud Station iOS App - Setup   Cloud Station iOS App
Cloud Station iOS App

Cloud Station iOS App   Cloud Station iOS App
Cloud Station iOS App

I have not experience any problems with Cloud Station so far, the only complain I have is that it takes quite a while (1-2 minutes) to connect to my Synology NAS for the initial computer’s bootup if you are using QuickConnect. I tried forwarding TCP port 6690 on my router to the Synology NAS and it only takes 30 seconds to connect!

To Be Continued …
For the third and final part of the review, I will talk about Synology multimedia features such as Video Station, Audio Station, Photo Station as well as their native iOS/Android mobile apps, DS video, DS audio, and DS photo+.

Recap

Synology DiskStation DS413j Review – Video, Audio & Photo Station

$
0
0

In my first part review of the Synology DiskStation DS413j, I talked about the Unboxing and Setup, in the second part review, I talked about the Performance, Backup & CloudStation and for this last review, I will talk about the multimedia features of the DS413j and that includes Video Station, Audio Station and Photo Station as well as their mobile apps, DS Video, DS Audio and DS Photo+ respectively.

There are a lot of features in the Video/Audio/Photo Station, and hence for this review, I will focus on my personal use case; I want to access/stream my music/video/photos stored in my Synology NAS wherever I am on my iPhone or Android.

If you need access to your photo, video and audio files outside of your own home, you will need to do port forwarding at your router, or alternatively you can use Synology QuickConnect which I covered previously.

For Video Station/DS Video & Audio Station/DS Audio, the port being used are 5000 (HTTP) and 5001 (HTTPS). In case you are wondering, port 5000 and 5001 are the same port being used to access your Synology DSM.

For Photo Station/DS Photo+, it uses the default http/https port 80 (HTTP) and 443 (HTTPS). I wish Synology would keep it consistant and use 5000 and 5001 instead.

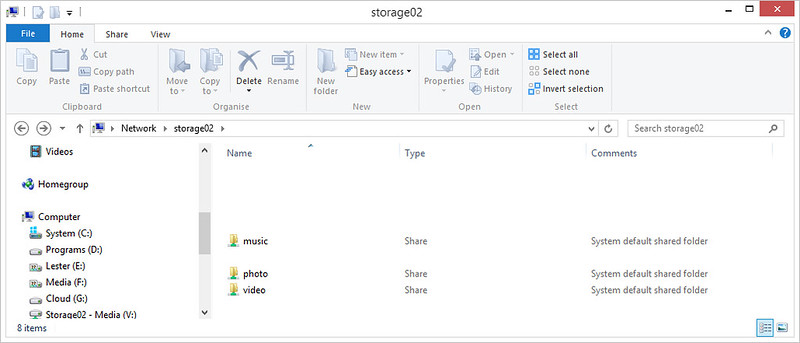
Once you have installed the respective packages under the Package Center in Synology DSM, for Photo/Audio station, it will create a shared folder called photo and music respectively, for video you will have the option of choosing a different name, but for convention sake, I named it as video.

Media Folders
Media Folders

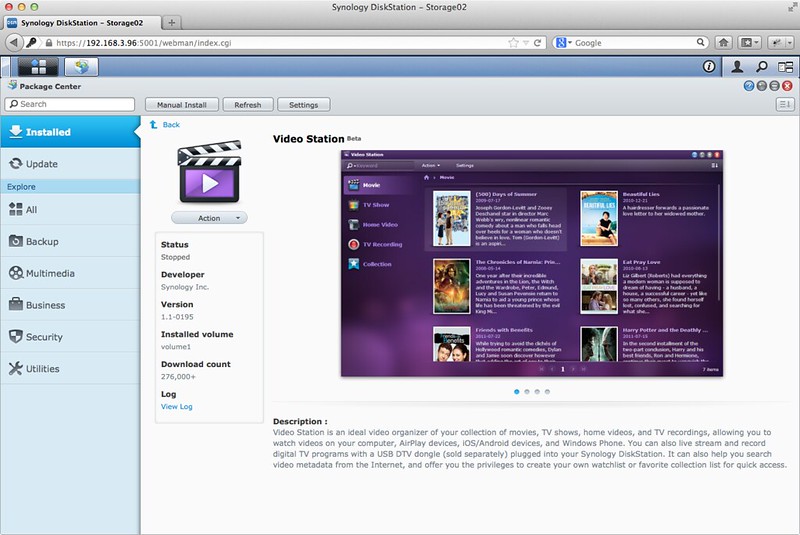
Video Station

Video Station Package

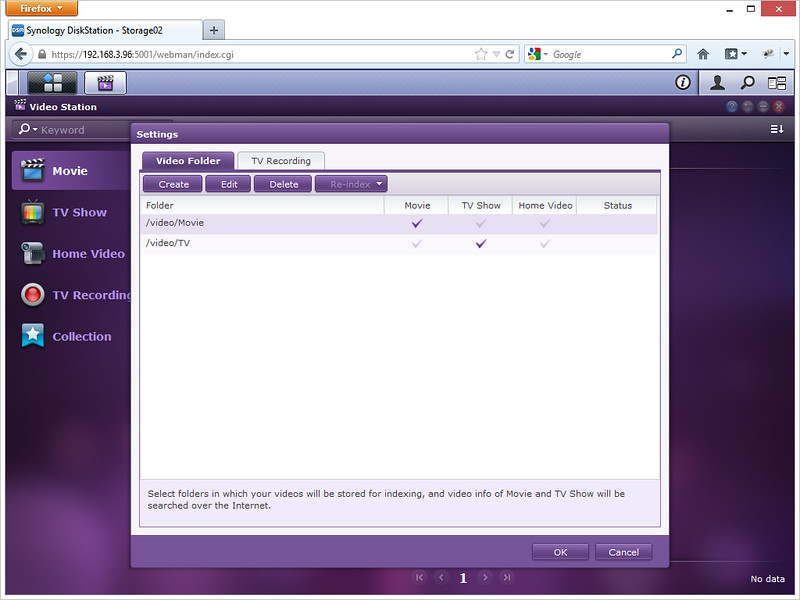
Under my video folder, I created 2 more folders, 1 called movie and another called TV to store movies and TV shows respectively.

Video Station - Settings
Video Station – Settings

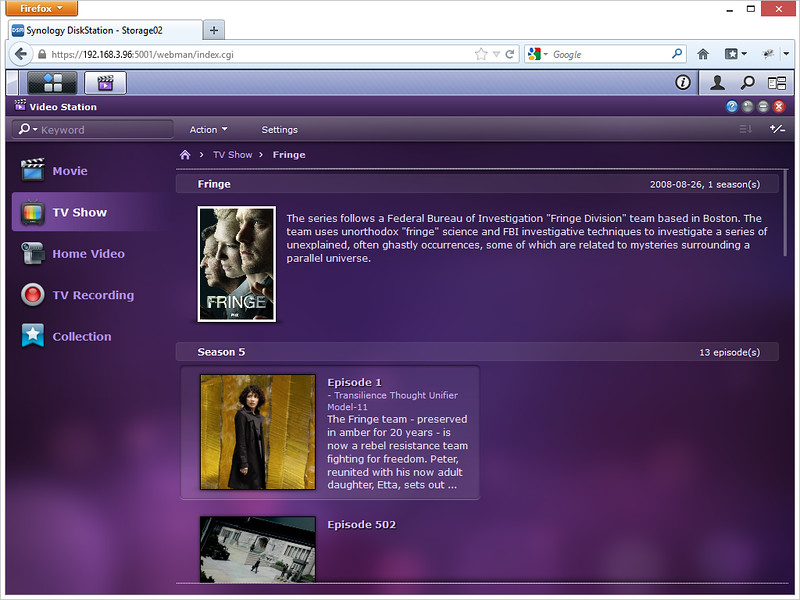
Once you have placed your video files into the respective sub folders, it will appear under your Video Station. To Access your Video Station, login to your Synology DSM, click on the top left button (Main Menu button) and choose Video Station. You can also drag out the Video Station icon to your Synology DSM desktop for quick access.

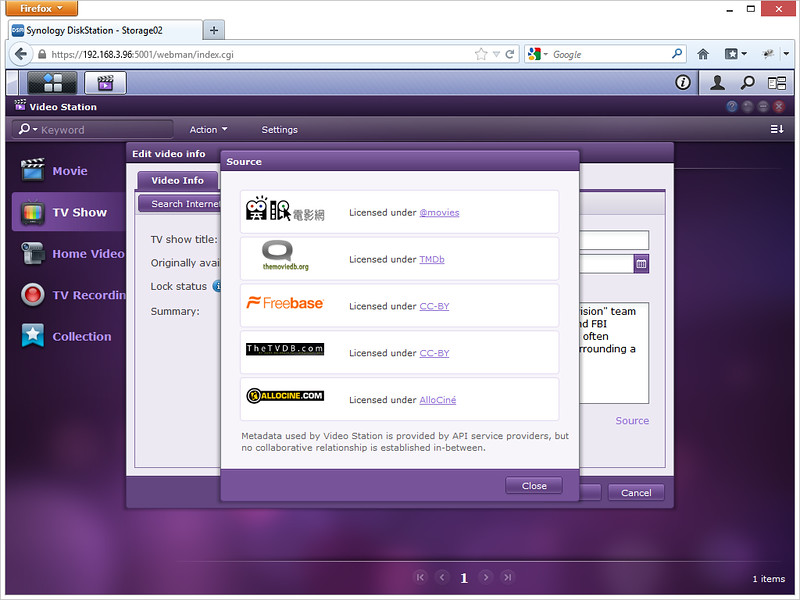
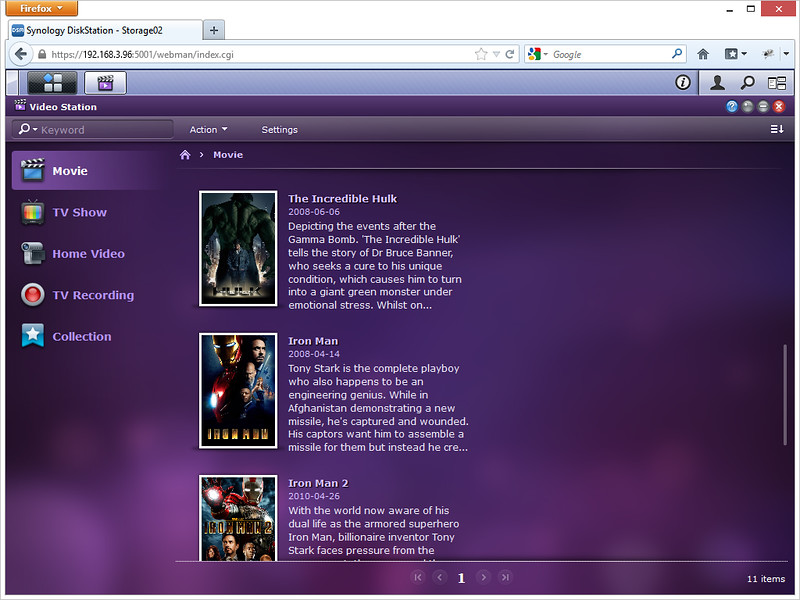
Video Station will try to determine the meta data of the movie, like the poster, official title of the movie, launch date as well as description. It gets the data from @movies, themoviedb.org, freebase, thetvdb.com and allocine.com

Video Station - Sources
Video Station – Sources

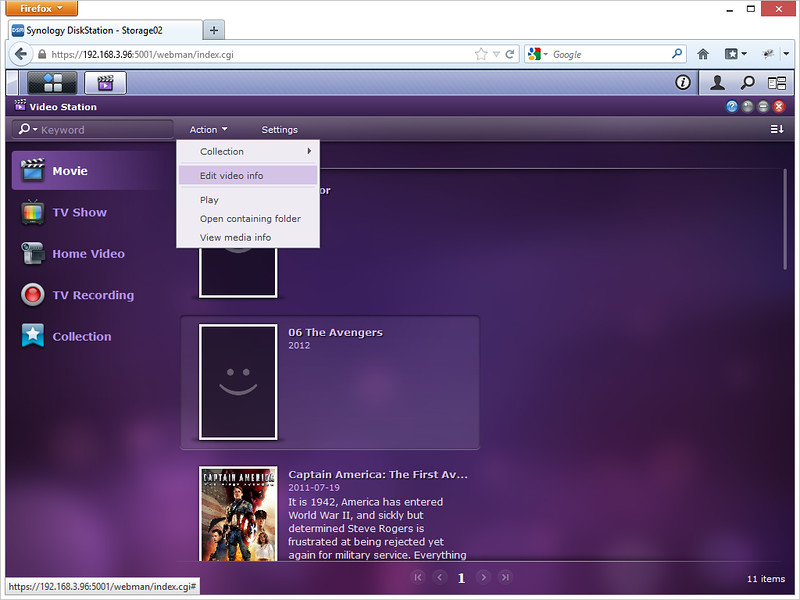
If the information is wrong or missing, you can edit the video info and correct it.

Video Station - Missing Infomation
Video Station – Missing Infomation

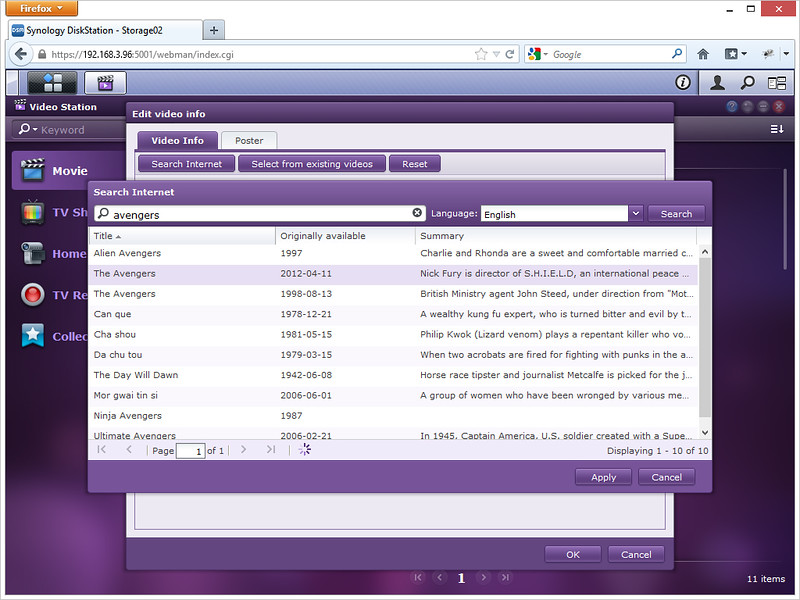
What amazes me is that you can search for the video meta data by just clicking the “Search Internet” button and type in your movie title, it will take roughly about 1 minute before the data is returned.

Video Station - Searching Information
Video Station – Searching Information

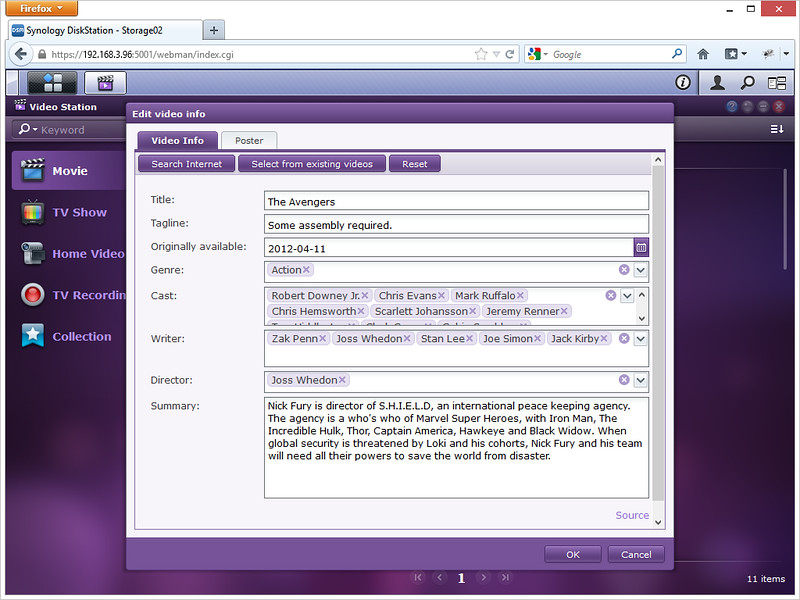
After choosing the correct meta data for your video, click “Apply” and there you go!

Video Station - With Searched Information
Video Station – With Searched Information

Video Station - Movies Listing
Video Station – Movies Listing

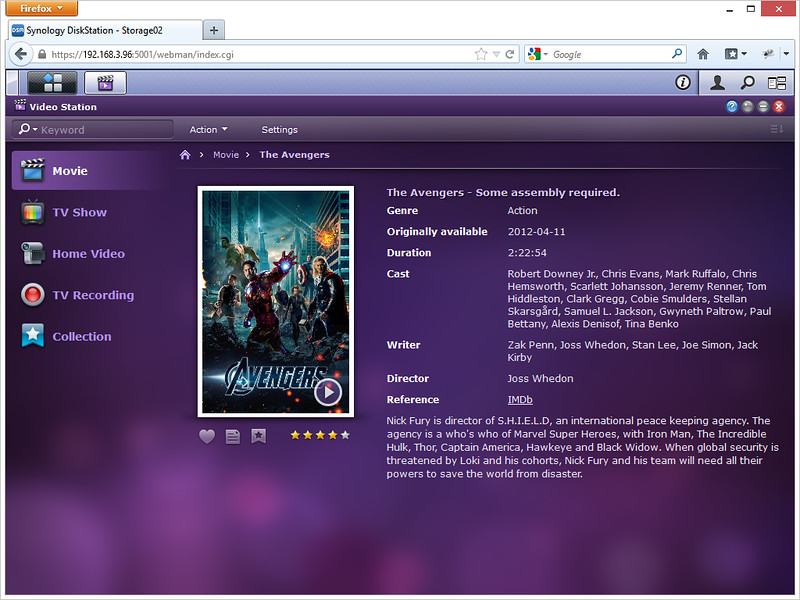
Video Station - Movie Information
Video Station – Movie Information

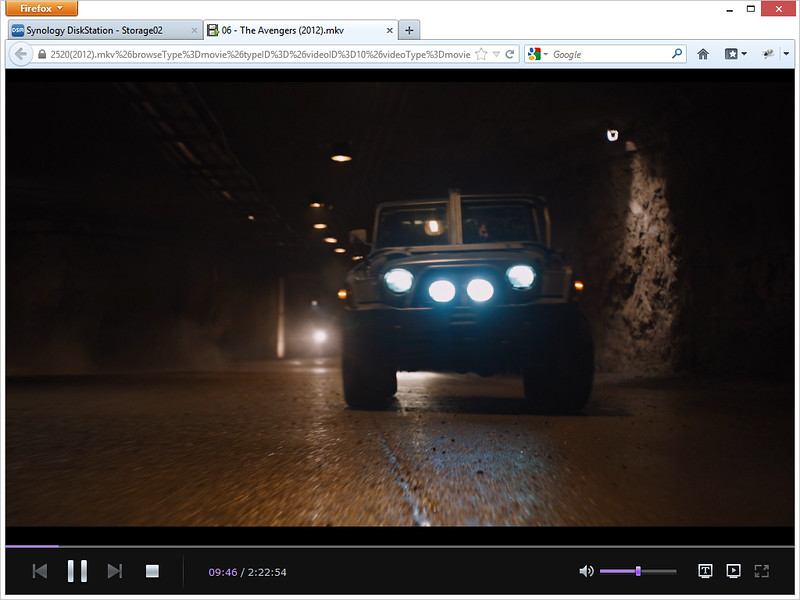
Video Station supports video streaming right in your browser. If you are playing a HD video (.mkv), the buffering takes very long (30 seconds) and the sound produced from the video playback is muffled as I am guessing they are transcoding the video to keep the data stream small. I don’t think I will be using this feature for movies.

Video Station - Movie Streaming
Video Station – Movie Streaming

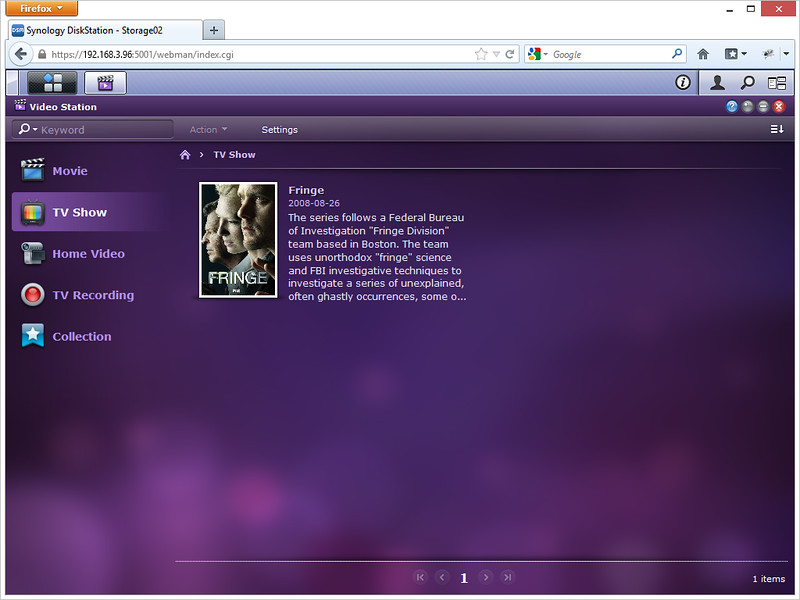
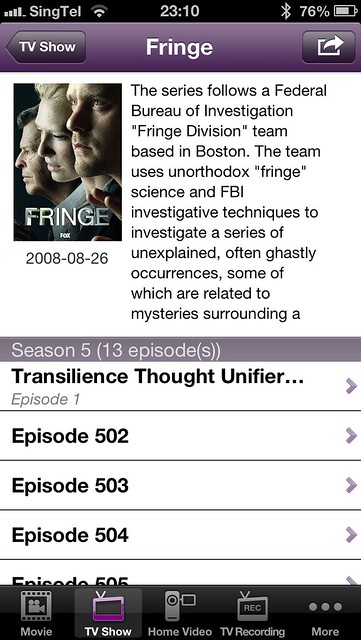
Video Station - TV Series Information
Video Station – TV Series Information

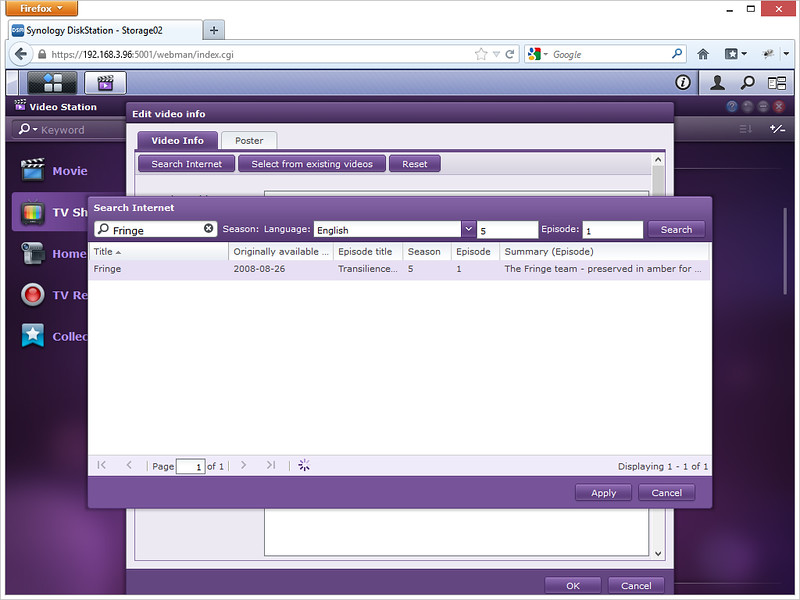
Video Station - Searching Episode Information
Video Station – Searching Episode Information

Video Station - TV Series Episode Listing
Video Station – TV Series Episode Listing

However if you are watching TV Shows, they normally come in .mp4 format and the file size is normally small and hence the streaming it is pretty smooth.

DS Video
DS Video is the app to access your Video Station’s video collection. You can stream videos and watch live TV programs (requires a DTV dongle). For streaming videos, if the file format is not supported by your iOS devices. Video Station will do real-time transcoding so that the videos can be played on your iOS devices. You can also assign video playback quality to ensure smooth streaming based on your Internet connection.

DS Video Download Link: iOS (Universal) | Android | Windows Phone

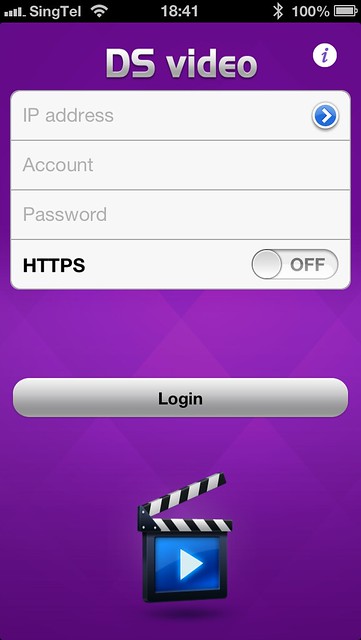
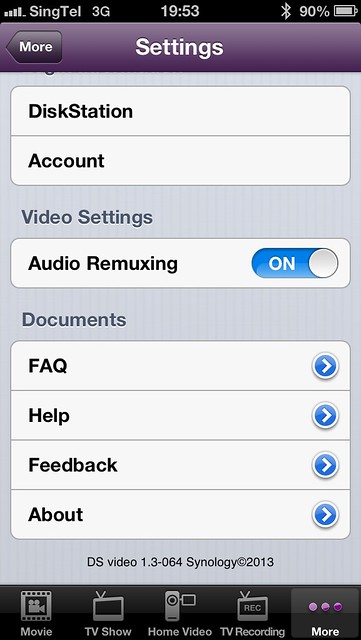
DS Video - LoginDS Video - Settings
DS Video – Login/Settings

If your video format is in .mp4, .m4v, or .mpv, it will play on iOS devices just fine and no transcoding is needed. On LTE, the streaming works smoothly though I get request time out at times when trying to stream the movie.

However, if your movie is in HD (.mkv) format, transcoding is needed and it faces the same issue as streaming the movie in your browser from your Video Station. The buffering is long and audio is muffled.

One cool feature of the Video Station is it supports resume, if you are streaming your tv show on your browser and need to attend to something, you can carry on where you left off on your DS Video app on the go.

DS Video - MovieDS Video - Movie
DS Video – Movie

It supports subtitles as well.

DS Video - Streaming Movie
DS Video – Streaming Movie

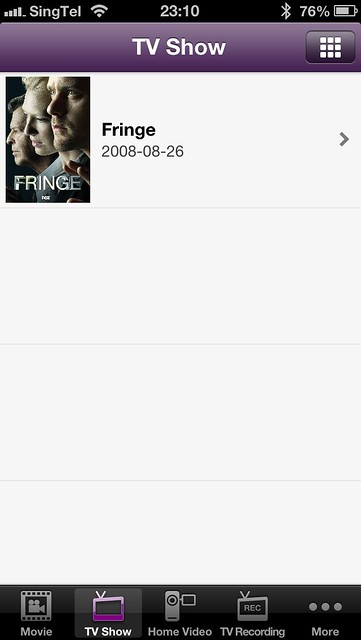
DS Video - TV ShowDS Video - TV Show
DS Video – TV Show

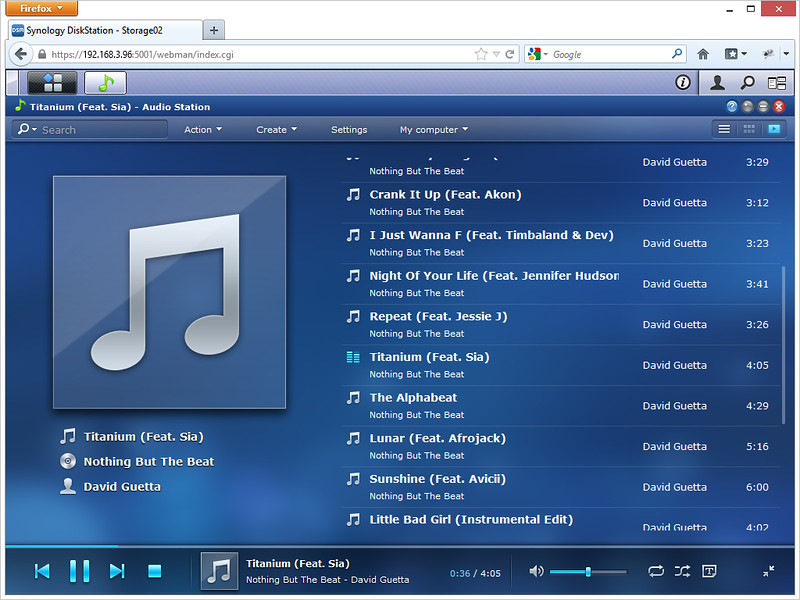
Audio Station

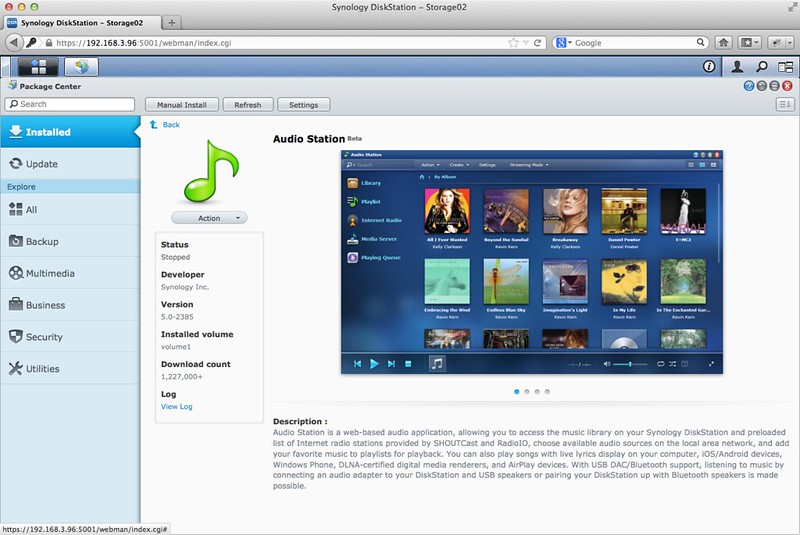
Audio Station Package

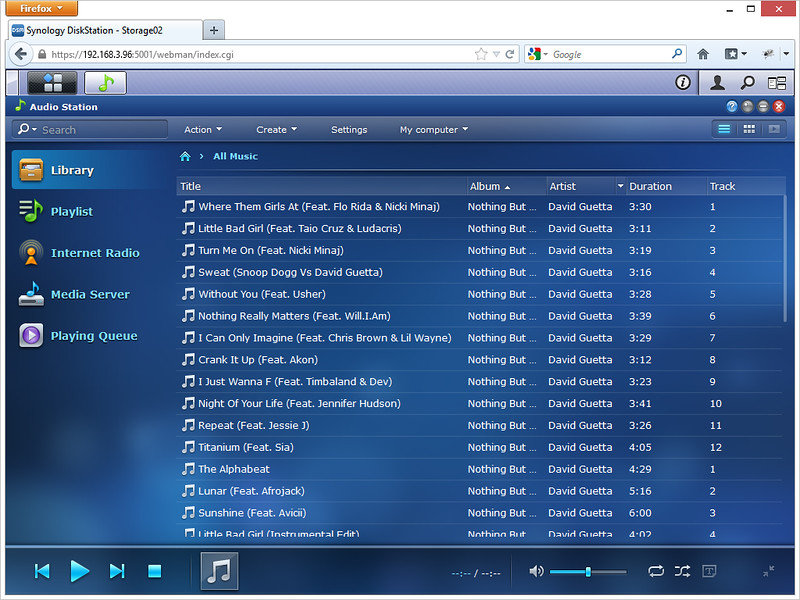
Similar to Video Station, to put music into Audio Station, simply copy your music files over to the music shared folder that has been created for you when you installed the Audio Station package. It will take about 15 seconds before it shows up in the Audio Station -> All Music.

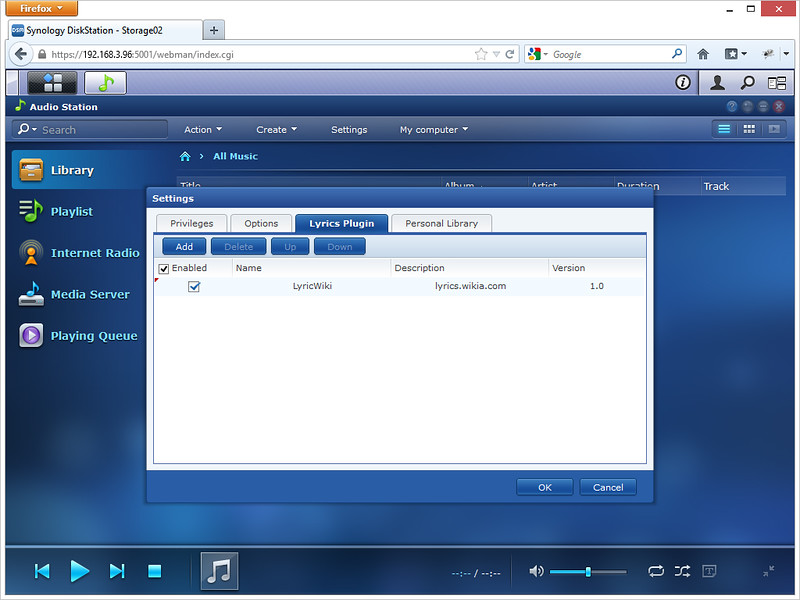
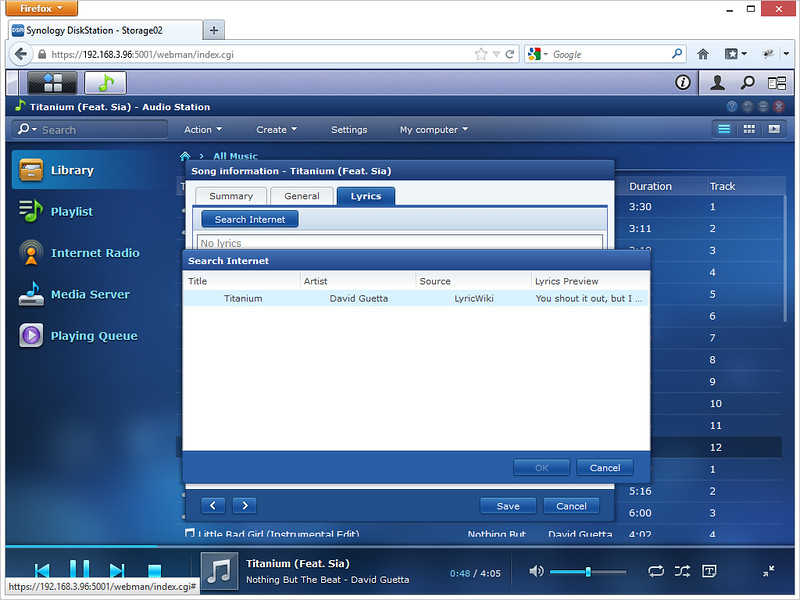
My impression of Audio Station is it is pretty straight forward to use, it lacks one feature, that is the ability to automatically find Album Cover Art for your song. It does that for lyrics but for some reason the lyrics are truncated after a certain character count for the default Lyrics source, lyrics.wikia.com.

Audio Station - Lyrics Settings
Audio Station – Lyrics Settings

Audio Station - All Songs
Audio Station – All Songs

Audio Station - Play Queue
Audio Station – Play Queue

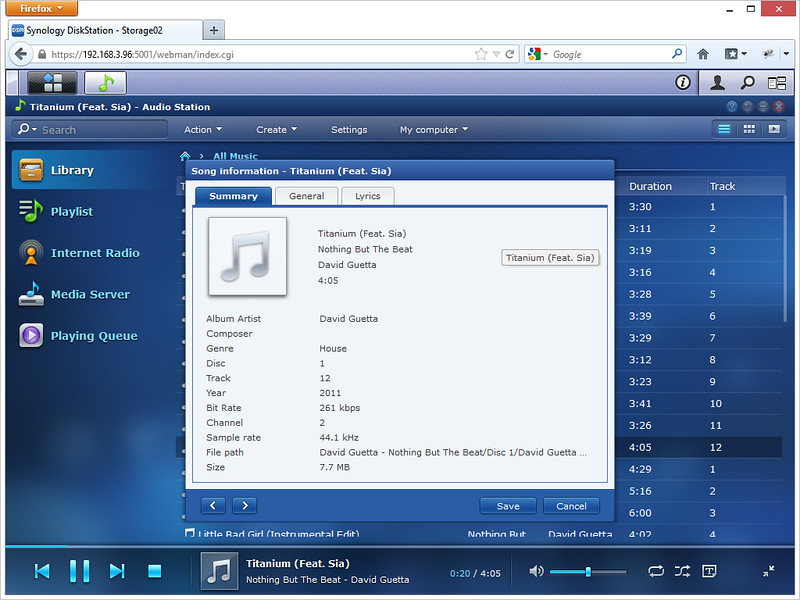
Audio Station - Song Information
Audio Station – Song Information

Audio Station - Finding Lyrics
Audio Station – Finding Lyrics

Audio Station - Album View
Audio Station – Album View

DS Audio
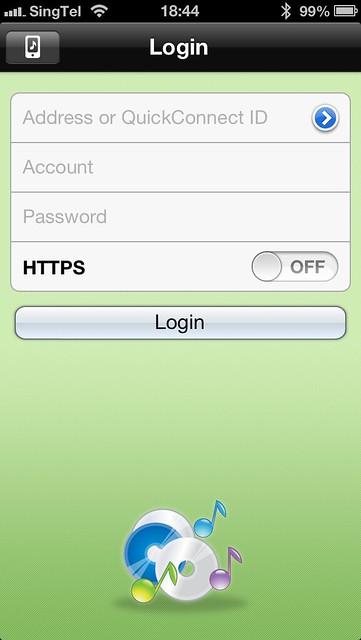
DS Audio is the app to access your Audio Station’s music collection. You can stream music, listen to music in offline mode and it even supports AirPlay (iOS only).

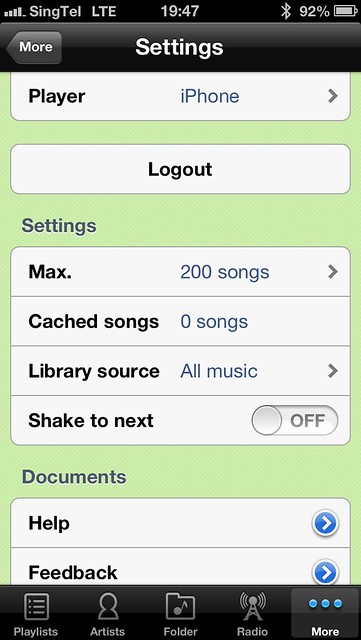
Streamed the songs from my Audio Station via LTE and the audio streaming was smooth, audio was clear. No complains here. After you played a song, it will be cached automatically for offline mode. You can set the maximum number of songs to be cached in the app settings.

DS Audio Download Link: iOS (Universal) | Android | Windows Phone

DS Audio - LoginDS Audio - Settings
DS Audio – Login/Settings

DS Audio - Different ViewsDS Audio - Different Views
DS Audio – Different Views

DS Audio - Different ViewsDS Audio - Different Views
DS Audio – Different Views

DS Audio - Playing a SongDS Audio - Playing a Song
DS Audio – Playing a Song

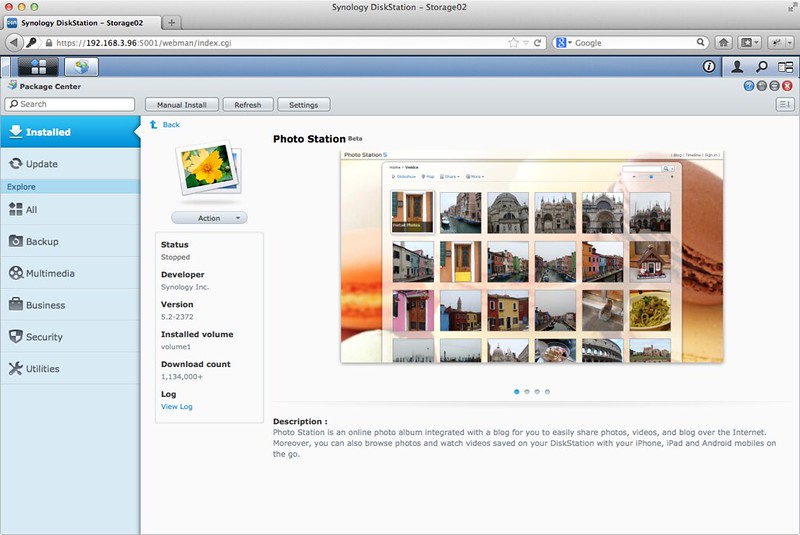
Photo Station

Photo Station Package

Similar to how copy files over to the folder in Video and Audio Station, for Photo Station, you copied your photos to the photo folder. Photo Station is a pretty comprehensive photo gallery for the web. If you are viewing photos at home, you would normally just use Finder (Mac) or Windows Explorer (Windows) and browse the shared photo folder. My guess is that Photo Station will be useful when you are at a friend’s house and want to show them photos that you have taken at a recent trip and do not want to share them on Facebook.

By default, all photos that you copied to the shared photo folder are set to private and hence you need to login to Photo Station using the same credentials as Synology DSM to view them.

Some interesting features in Photo Station includes Face Recognition which is still experimental as well as a photo blog with commenting functionality. With regards to social integration (Facebook, Twitter, Plurk, Google+, Weibo and QQ) you can share photos stored in your Photo Station.

Photo Station - Album View
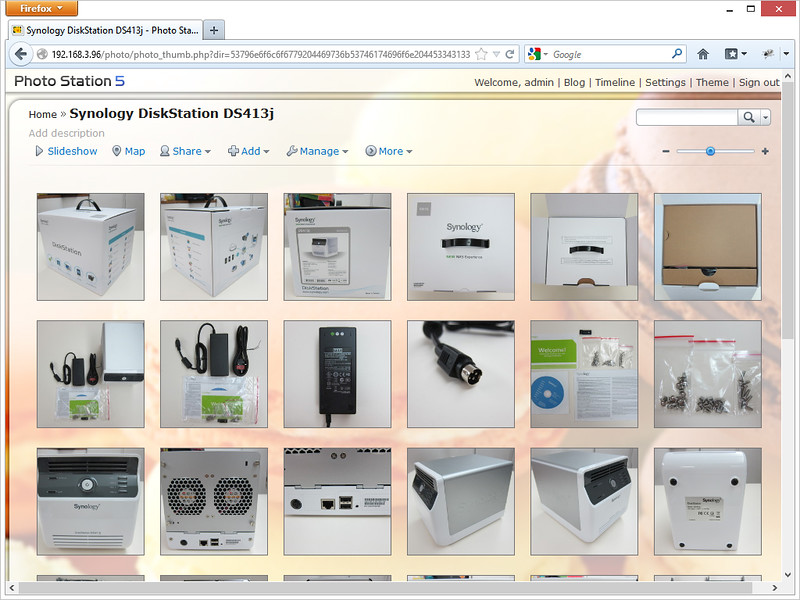
Photo Station – Album View

Photos Station - Photo In Album
Photo Station – Photos In Album

Photo Station - Viewing Photo
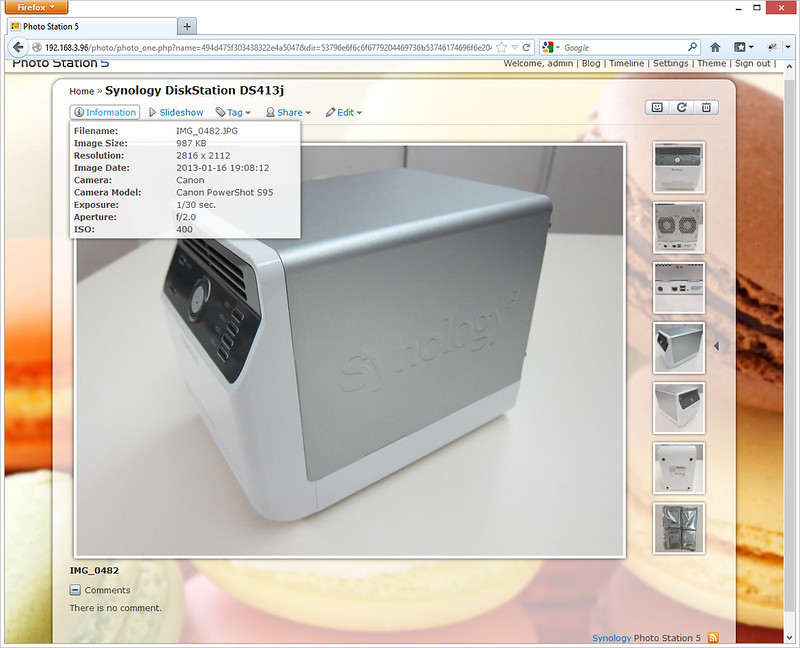
Photo Station – Viewing Photo

DS Photo+
DS Photo+ is the app to access your Photo Station’s photos. I am not too sure why is there a + behind the name “DS Photo”. There is an app called DS Photo before DS Photo+ but it could only view photos and not upload them from your mobile device.

With DS Photo+, you can view all your photos stored in Photo Station, you can also upload your mobile device’s camera photos to Photo Station. If you connect your printer to DS413j, you can print those photos via AirPrint (iOS only).

DS Photo+ Download Link: iOS (Universal) | Android | Windows Phone

DS Photo+ - LoginDS Photo+ - Settings
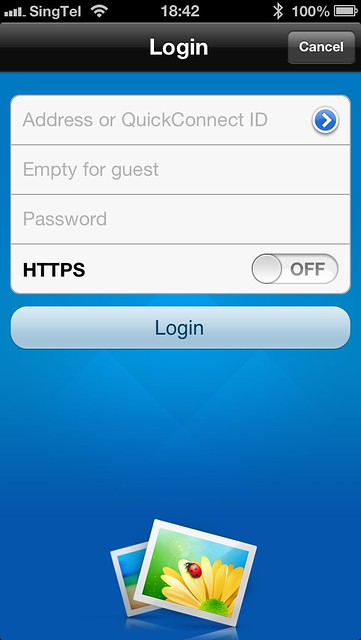
DS Photo+ – Login/Settings

DS Photo+ - AlbumDS Photo+ - Album
DS Photo+ – Album

DS photo+ - Listing Photos In AlbumDS photo+ - Listing Photos In Album
DS photo+ – Listing Photos In Album

DS Photo+ - Viewing PhotoDS Photo+ - Viewing Photo
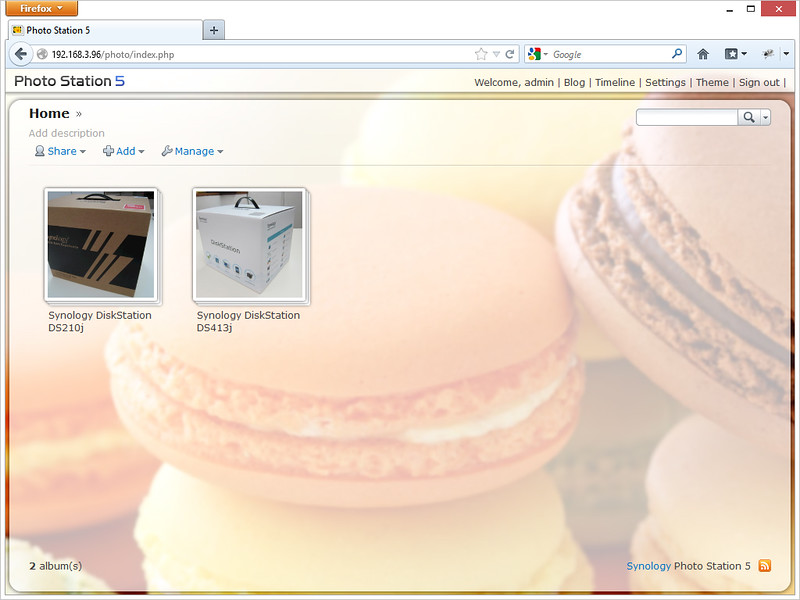
DS Photo+ – Viewing Photo

DS Photo+ - Photo InfoDS Photo+ - Search
DS Photo+ – Photo Info/Search

Summary – Video/Audio/Photo Station + DS Video/Audio/Photo+
Video/Audio/Photo Station is a very well done web companion packed with features to view and organise your multimedia content. But for most people who use them only at home, it may not be as useful as it is faster to use native viewer (Finder/Windows Explorer) to navigate through and view/play the content.

Having said that, the mobile companion apps like the DS Video/Audio/Photo+ are more useful, because you will have access to all your multimedia contents right in your mobile phone wherever you are regardless whether you are using an iOS, Android or Windows Phone.

Summary
The Synology DiskStation DS413j is expensive for some people, because after adding in the HDD cost, it can easily cost up to SGD$1,600. But to justify the cost, the Synology DSM is the best NAS web UI I have ever seen, it packs tons of features and it is easy to use.

A NAS is meant to be on for 24/7 which means you can use Cloud Station for it and depending on the size of your HDD and your RAID type, you can easily get 2TB of storage. In comparison, a 1TB Dropbox for Team plan for 5 users/year will cost you USD$795 (SGD$982).

Once you have use a Synology NAS, you will never look back. I have been through that path of using D-Link, Iomega and Buffalo NAS.

If you are having a budget constraint, I would recommend you the Synology DiskStation DS212J (2-Bays NAS) instead. The unit itself cost SGD$380 and getting 2x WD Red 2TB will cost you SGD$190 each, setting you back a total of SGD$760.

Pros:

  • Synology DSM is packed with awesome features
  • Used with WD Red, the HDDs are almost slient
  • Good mobile support (DSM Mobile, iOS & Android native apps)
  • Cloud Station is a very good alternative to a private Dropbox

Cons:

  • Might be expensive to some
  • QuickConnect is useful for non tech-savy users but it is pretty slow to connect

Recap


Asus WL-330NUL (World’s Smallest Router)

$
0
0

Asus launched the world smallest router last week measuring 6.5cm long and weighing 17.5g, the Asus WL-330NUL. It is available since 20th May 2013 for SGD$59.

The Asus WL-330NUL is a 4-in-1 router, it acts like a router, USB Ethernet adapter, Wireless adapter and supports hot spot sharing!

Too bad there is no built-in battery for it and it does not support gigabit connection due to the speed limitations of USB2. It only supports the older 2.4GHz and not the newer 5.GHz.

Router
Just connect an Ethernet cable and instantly create a secure wireless network environment for all your devices. In addition, the WL-330NUL can also manage several network users at once, with different access privileges.

Hot Spot Sharing
The WL-330NUL features an easy to use and versatile hot spot mode. Wherever power and wireless connectivity are available, it allows sharing a single account on multiple devices.

USB Ethernet Adapter
As ultrabooks usually lack an RJ-45 wired LAN port and only support Wi-Fi, the WL-330NUL has been especially designed for business travelers and users of ultrabooks. Simply connect a network cable to your ultrabook via USB port, and the WL-330NUL provides stable and reliable online access anywhere.

Wireless Adapter
The WL-330NUL is also the perfect backup should your integrated wireless hardware experience any issues. To get Wi-Fi access, simply plug it to your notebook via USB. This also makes the WL-330NUL perfect for desktops, which traditionally lack Wi-Fi capabilities and limit you to wired connections.
Technical Specifications

  • Interface: 1x RJ45 for 10/100 BaseT with auto cross-over function (MDI/MDI-X)
  • Antenna: 1x Internal 2 dBi antenna
  • Operating Frequency: 2.4GHz
  • Management: Guest SSID, Site Survey, DHCP server, DHCP client, Static IP, Upgrades via web browser
  • Firewall: NAT, Virtual DMZ
  • Encryption: 64/128-bit WEP, WPA TKIP/AES, WPA2 TKIP/AES
  • Authentication: MAC address
  • Utilities: WL-330NUL Ultra-Link Utility, One-click guest management, Web-base administration
  • Power Adapter: AC Input: 110V~240V(50~60Hz), DC Output: 5 V with max. 1A current
  • OS Support: Windows 8, Windows 7, Windows Vista, Windows XP, Mac OS X 10.5 to 10.8, Linux
  • Dimensions (WxDxH): 65 x 20.7 x 15.4 mm
  • Weight: 17.5g

Asus WL-330NUL
Asus WL-330NUL

D-Link DIR-868L AC Router Review

$
0
0

The D-Link DIR-868L Wireless AC 1750 Dual-Band Gigabit Router is retailing for SGD$319 (Challenger’s member’s price: SGD$279) which is pretty steep for a router. It is still cheaper than the Cisco Linksys EA6500 AC Router when it was first launched.

The DIR-868L is a draft IEEE 802.11ac router that supports simultaneous dual band (2.4GHz + 5GHz) and can give you speed up to 450Mbps + 1,300Mbps. It is also a “cloud router”, in the sense that you can access your router basic settings via mydlink Lite app on iOS or Android.

Specifications (From SmallNetBuilder)

  • CPU: Broadcom BCM4708X
  • RAM: 128MB
  • Flash: 128MB
  • Wireless: 802.11 a/b/g/n/ac wireless LAN
    • 2.4GHz
      • Broadcom BCM4331
      • IEEE 802.11n, IEEE 802.11g, IEEE 802.11b
    • 5GHz
      • Broadcom BCM4360
      • IEEE 802.11ac (draft), IEEE 802.11n & IEEE 802.11a
  • LAN/WAN
    • 4x 10/100/1000 Gigabit LAN ports
    • 1x 10/100/1000 Gigabit WAN port
    • Broadcom BCM4708X
    • IEEE 802.3 & IEEE 802.3u
  • Antennas: Six internal antennas
  • Other Ports: 1x USB 3.0 port
  • Dimensions (L x W x D): 102.3 x 123.3 x 217mm
  • Weight: 560g
  • mydlink Features
    • Remote Management
    • View current upload/download bandwidth
    • View currently connected clients
    • View web browsing history per client
    • Block/unblock client network access
    • Manage wireless network details
    • Accessible through a web browser or iOS or Android
  • Mobile App

D-Link DIR-868L - Box Front
D-Link DIR-868L – Box Front

D-Link DIR-868L - Box Back
D-Link DIR-868L – Box Back

D-Link DIR-868L - Box Contents
D-Link DIR-868L – Box Contents

Design
This is the first time I am using a router with a totally different design, it is placed upright and the design resembled the new Apple Mac Pro. Can’t really say I am fan of this design but it looks nice and I do get better wireless signal around my house (more details below).

The upright design makes the router tall and flimsy (prone to topple) when placed on a uneven surface. I am placing it on top of my Bluelounge Cablebox.

I think the router can be heavier (currently weight is 560g) to prevent itself from being toppled easily, like maybe adding a few fans inside it? The WD My Net N900 Router has fans inside it.

D-Link DIR-868L - Front View
D-Link DIR-868L – Front View

Back D-Link DIR-868L - Back View
Back D-Link DIR-868L – Back View

D-Link DIR-868L - Placing On Top My Bluelounge Cablebox
D-Link DIR-868L – Placing On Top My Bluelounge Cablebox

Ports/Buttons
Previously, I am using the Western Digital My Net N900 Router and I am going to miss the built-in 7 LAN ports.

The DIR-868L ports are located at the back and are pretty standard. 1x USB 3.0 port, 4x 10/100/1000 Gigabit LAN ports, 1x 10/100/1000 Gigabit WAN port and 1x power port. There are 2 buttons, the Wi-Fi Protected Setup (WPS) button which I have never used before (because I don’t find a need to) and the power button.

I think the power button is a great addition to the router. I don’t remember my D-Link DIR-855 having a power button and when I want to restart my router, I always have to plug out and plug in the power cable.

D-Link DIR-868L - Ports
D-Link DIR-868L – Ports

D-Link DIR-868L - All Plugged In
D-Link DIR-868L – All Plugged In

Something that I am not aware is that USB 3.0 port on a router will create interference to the 2.4 GHz wireless band. I got to know this after reading shadowandy’s review of the router. For more detailed explaination you can checkout Intel’s USB 3 Frequency Interference Paper.

That is the reason why the USB 3.0 speed is disabled by default in the admin interface and when you try to change it, they will warn you.

D-Link DIR-868L - USB 3.0 Warning
D-Link DIR-868L – USB 3.0 Warning

Admin Interface
The admin interface is the same old orange D-Link interface which I grown to like when I am using the DIR-855. I am glad they did not change it. It is functional and it loads fast!

Here are some screenshots:

D-Link DIR-868L - Internet Setup
D-Link DIR-868L – Internet Setup

D-Link DIR-868L - Wireless Setup
D-Link DIR-868L – Wireless Setup

D-Link DIR-868L - Status Page
D-Link DIR-868L – Status Page

D-Link DIR-868L - Virtual Server
D-Link DIR-868L – Virtual Server

Wireless Strength
I am using WiFi Explorer on my MacBook Air to test the wi-fi signals at 2 of my favourite spot in my house, my room and the toilet.

WiFi Explorer - My Room
WiFi Explorer – My Room

WiFi Explorer - Toilet
WiFi Explorer – Toilet

From the table below, when it comes to 5GHz band, the D-Link DIR-868L wins all my previous routers. But when you compare the 2.4GHz band, it’s performance is just average.

Location DIR-868L My Net N900 EA6500 EA4500 DIR-855
My Room (2.4GHz) 79% 75% 79% 78% 80%
My Room (5GHz) 91% 64% 64% 65% 46%
Toilet (2.4GHz) 58% 46% 53% 72% 56%
Toilet (5GHz) 55% 35% 41% 33% 31%

Speed
Like all previous router reviews, I am using Speedy Net to test the speed of file transfers within my house network.

Speedy Net - 1Gbps LAN (iMac) to 1Gbps LAN (MacBook Air)
Speedy Net – 1Gbps LAN (iMac) to 1Gbps LAN (MacBook Air)

Speedy Net - 1Gbps LAN (iMac) to Wireless N 5GHz (MacBook Air)
Speedy Net – 1Gbps LAN (iMac) to Wireless N 5GHz (MacBook Air)

Speedy Net - Wireless N 5GHz (iMac) to Wireless N 5GHz (MacBook Air)
Speedy Net – Wireless N 5GHz (iMac) to Wireless N 5GHz (MacBook Air)

From the table below, you can see that the DIR-868L beats WD My Net N900 and Linksys EA4500 in the Wireless N tests. I will have another blog post comparing the speed of Wireless AC of this router vs the Cisco Linksys EA6500.

Type DIR-868L My Net N900 EA4500
LAN to LAN 500.19Mbps - -
LAN to Wireless N (5GHz) 217.61Mbps 113.48Mbps 107.81Mbps
Wireless N (5GHz) to Wireless N (5GHz) 75.71Mbps 63.01Mbps 65.17Mbps

mydlink Lite
mydlink Lite app is available on iOS and Android. It allows you to check your router current upload/download bandwidth, or manage your wireless network security and status. It also has parental controls like letting you see what sites your children have visited, and you can even block or unblock network access for individual devices.

mydlink Lite iOS Appmydlink Lite iOS App
mydlink Lite iOS App

mydlink Lite iOS Appmydlink Lite iOS App
mydlink Lite iOS App

mydlink Lite iOS Appmydlink Lite iOS App
mydlink Lite iOS App

Summary
The recommended retail price (RRP) is SGD$319, which is pretty expensive. I think you can get it cheaper at Fuwell in Sim Lim Square when it is available there. I hope Fuwell will price this router lower than its immediate competitor which is the Asus RT-AC66U, priced at SGD$309.

Apart from the pricing setback, I totally love this router, the signal is good, speed is fast and the admin UI is functional. I am glad to be back to D-Link after a year of hiatus.

If you want a more technical review on this router, checkout SmallNetBuilder.

Stay tuned to my next blog post for the review of the Wireless AC speed using the D-Link DWA-182 Wireless AC1200 Dual Band USB Adapter.

Pros:

  • Excellent wireless signal coverage for 5GHz band
  • Excellent wireless speed
  • Unique design (I think most people will like it)
  • There is a power button (I have to list this)
  • Functional & fast loading admin interface

Cons:

  • Expensive
  • Topple easily when placed on an uneven surface
  • Average wireless signal coverage for 2.4GHz band

Huawei E5372 4G Mobile Wi-Fi Modem

$
0
0

I was using the Huawei MiFi E585 which I bought 4 years ago till the battery life decided to give up on me. The battery will go flat after about an hour of usage. On top of that I am spoilt with 4G because the 3G speed is way too slow in Singapore, due to bandwidth congestion.

I wanted to get a 4G mobile wi-fi modem last year but it was still pretty expensive, but this year it seems the prices has drop quite a bit. I bought the Huawei E5372 4G Mobile Wi-Fi Modem from a reseller (romz1983) in HardwareZone Forums for SGD$230. If you are interested in getting it, check out the forum thread, WTS: Great MIFI sale from $90 Huawei E589 E5776 E5331 E5220 E5151 ZTE MF60 Wifi Router. He offers other models as well.

The mobile wi-fi modem is actually from Telstra which is an Australia teleco that Huawei OEM for. It comes with 3,560 mAh battery instead of the default 1,780 mAh which gives you up to 10 hours of battery life instead 6 hours. It uses the normal SIM card instead of micro or nano SIM. If you have a SIM adapter, you can use it with it. Accordingly to romz1983, this is the first 150Mbps LTE mobile wi-fi modem that allows you to use SIM adapter. I am using micro SIM with a SIM adapter and it works fine.

One of the reason for getting a mobile wi-fi modem instead of tethering from my phone is because tethering drains your mobile phone battery very fast (though you can keep it charging using a portable battery). I hope 2014 is the year where MacBook Pros/Airs will have a built-in SIM card slot!

Specifications

  • 4G: Band 900/1800/2100/2600 MHz
  • 3G: UMTS/WCDMA Bands 2100/1900/900/850 Mhz
  • 2G: GPRS/GSM/EDGE 850/900/1800/1900 MHz
  • Speed: LTE Speed up to 150Mbps (Download) and 50Mps (Upload)
  • Dimensions: 99mm x 62.2mm x 14.4mm (Width x Height x Depth)
  • Weight: 140g (including battery)
  • SIM Card Slot: Normal SIM (Micro SIM & Nano SIM can be used with adapter)
  • microSD Card Slot: Support up to 32GB
  • Wi-Fi: IEEE 802.11b/g/n
  • Wi-Fi Connected Devices: Up to 10 simultaneous device
  • Battery: 3,560 mAh
  • Battery Life: About 10 hours

Huawei E5372 - Box Front
Huawei E5372 – Box Front

Huawei E5372 - Box Back
Huawei E5372 – Box Back

Huawei E5372 - Box
Huawei E5372 – Box

Huawei E5372 - Box Contents
Huawei E5372 – Box Contents

Huawei E5372 - Power Adapter
Huawei E5372 – Power Adapter

Huawei E5372 - Battery Front
Huawei E5372 – Battery Front

Huawei E5372 - Battery Back
Huawei E5372 – Battery Back

Huawei E5372 - Battery
Huawei E5372 – Battery

Huawei E5372 - Front
Huawei E5372 – Front

Huawei E5372 - Back
Huawei E5372 – Back

Huawei E5372 - Back Opened
Huawei E5372 – Back Opened

Huawei E5372 - Back Opened (With SIM)
Huawei E5372 – Back Opened (With SIM)

Huawei E5372 - Micro USB Port
Huawei E5372 – Micro USB Port

Huawei E5372 - Menu Button
Huawei E5372 – Menu Button

Huawei E5372
Huawei E5372

Huawei E5372 - Switched On
Huawei E5372 – Switched On

Huawei E5372 - Web UI
Huawei E5372 – Web UI

Linksys WRT1900AC Router Review

$
0
0

The Linksys WRT1900AC box got to be the biggest box for a router that I have received. When I opened the box, everything is held in place with foam instead of cardboard and there is sponge sticked to the top of the box to protect the router. I have not seen such premium packaging before for a router.

The Linksys WRT1900AC will be retailing for SGD$399 which makes it the most expensive consumer router that I come across. It is even more expensive than the Asus RT-AC68U. It will be exclusively available at all Challenger outlets from 22nd May 2014 (yesterday) to 22nd June 2014. After that, it will be available at all other leading IT stores in Singapore from 23 June 2014 onwards.

Linksys WRT1900AC - Box Front
Linksys WRT1900AC – Box Front

Linksys WRT1900AC - Box Bottom
Linksys WRT1900AC – Box Bottom

Linksys WRT1900AC - Box Left
Linksys WRT1900AC – Box Left

Linksys WRT1900AC - Box
Linksys WRT1900AC – Box

Linksys WRT1900AC - Box Open
Linksys WRT1900AC – Box Open

Specifications (From SmallNetBuilder)

  • CPU: Marvell MV78230 Armada XP (1.2 GHz, 2 cores)
  • RAM: 256MB
  • Flash: 128MB
  • Wireless: 802.11 a/b/g/n/ac wireless LAN
    • 2.4GHz
      • Marvell 88W8864
      • IEEE 802.11n, IEEE 802.11g, IEEE 802.11b
      • Speeds up to 600 Mbps
    • 5GHz
      • Marvell 88W8864
      • IEEE 802.11ac, IEEE 802.11n & IEEE 802.11a
      • Speeds up to 1300 Mbps
  • LAN/WAN
    • 4x 10/100/1000 Gigabit LAN ports
    • 1x 10/100/1000 Gigabit WAN port
    • Marvell MV78230
  • Antennas: Four exchangeable external antennas
  • Other Ports: 1x USB 3.0 port, 1x eSATA/USB 2.0 Port
  • Dimensions (H x W x D): 3.81 x 25.4 x 19.05cm
  • Weight: 1kg
  • Linksys Smart Wi-Fi Mobile App

Features

  • Pre-configured Virtual LAN (VLAN) IDs of all major fiber Internet service providers in Singapore
  • Browser-based setup for installation from device PC/Mac, smartphone or tablet
  • Can be configured as: router, range extender (aka repeater) or wireless bridge
  • Ability to hide SSID broadcast
  • Setup wizard sets up two SSIDs, one per radio band
  • Linksys Smart Wi-Fi can be accessed from a browser or the Linksys Smart Wi-Fi app for iOS and Android
  • Share printers or storage devices through USB or eSATA
  • Built-in DLNA-certified media server and FTP server to share files
  • Drag-and-drop media prioritisation to prioritise bandwidth for devices, applications or games
  • Parental controls to prevent access to websites or block access during certain hours
  • Dynamic DNS services supported: No-IP, DynDNS and TZO
  • Built-in speed test to test broadband upload and download speed

Unboxing

Linksys WRT1900AC - Sponge In Box
Linksys WRT1900AC – Sponge In Box

Linksys WRT1900AC - Box Open Inner
Linksys WRT1900AC – Box Open Inner

Linksys WRT1900AC - Box Open Inner
Linksys WRT1900AC – Box Open Inner

Linksys WRT1900AC - Box Contents
Linksys WRT1900AC – Box Contents

Linksys WRT1900AC - Power Adapter/Cables
Linksys WRT1900AC – Power Adapter/Cables

Linksys WRT1900AC - Manuals
Linksys WRT1900AC – Manuals

Linksys WRT1900AC - Power Adapter
Linksys WRT1900AC – Power Adapter

Linksys WRT1900AC - Power Adapter
Linksys WRT1900AC – Power Adapter

Linksys WRT1900AC - Antenna
Linksys WRT1900AC – Antenna

Design
I love the design of the WRT1900AC. I think it is the best looking router in the market right now. The design was inspired by the very popular and iconic WRT54G Wi-Fi router which was introduced 11 years ago. It even take on the same blue and black colour.

The WRT1900AC is huge, measuring 3.81cm (H) x 25.4cm (W) x 19.05cm (D) and heavy, weighing about 1kg and that makes it feels solid and stable when placed on a table.

Linksys WRT1900AC - Top
Linksys WRT1900AC – Top

Linksys WRT1900AC - Bottom
Linksys WRT1900AC – Bottom

Linksys WRT1900AC - Front
Linksys WRT1900AC – Front

Linksys WRT1900AC - Back
Linksys WRT1900AC – Back

From left to right:

  • Wi-Fi Protected Setup (WPS) Button
  • 4x Gigabit Ports
  • 1x USB3.0 Port
  • 1x eSATA/USB2.0 Port
  • Reset Button
  • 12v DC Power
  • On/Off Switch

Linksys WRT1900AC - Right
Linksys WRT1900AC – Right

Linksys WRT1900AC - Left
Linksys WRT1900AC – Left

Linksys WRT1900AC - Without Antennas
Linksys WRT1900AC – Without Antennas

Ports/Buttons
The ports of the router is pretty standard except for one port which is the eSATA/USB2.0 Port. I have not seen a port like that before in a router. They port name is called eSATAp (also known as Power over eSATA, Power eSATA, eSATA/USB Combo, eSATA USB Hybrid Port (EUHP)).

Linksys WRT1900AC - USB/eSATA Port
Linksys WRT1900AC – USB/eSATA Port

When you connect a eSATA hard drive to the port, it will give you transfer speed up to 3Gbps whereas if you connect a USB 2.0 hard drive, it will give you speed up to 480Mbps. I wish the port supports USB 3.0 instead of 2.0.

Linksys WRT1900AC - Ports
Linksys WRT1900AC – Ports

Light Indicators

Linksys WRT1900AC - Light Indicators
Linksys WRT1900AC – Light Indicators

Linksys WRT1900AC - Light Indicators
Linksys WRT1900AC – Light Indicators

Linksys WRT1900AC - Light Indicators
Linksys WRT1900AC – Light Indicators

Setup
My house Internet setup is little bit different as I need to bridge my Residential Gateway and Router and hence the default instructions will not work for me.

The default instructions require me to go to linksyssmartwifi.com to setup my router which will not work for me because my router needs to be on Static IP and without configuration, my router essentially has no Internet access.

Instead, I have to go to the default router IP which is http://192.168.1.1 to setup and the default router password is admin.

Linksys Smart Wi-Fi - Setup #1
Linksys Smart Wi-Fi – Setup #1

Linksys Smart Wi-Fi - Setup #2
Linksys Smart Wi-Fi – Setup #2

Linksys Smart Wi-Fi - Setup #3
Linksys Smart Wi-Fi – Setup #3

Linksys Smart Wi-Fi - Connectivity - Internet Settings
Linksys Smart Wi-Fi – Connectivity – Internet Settings

The WRT1900AC supports VLAN tagging and it comes pre-configured with VLAN IDs of all major fiber Internet service providers in Singapore. What this means is that you can replace the crappy wireless router you have from your ISP with the WRT1900AC. So now the WRT1900AC will connect directly to the Optical Network Terminal (ONT).

Linksys Smart Wi-Fi - Connectivity - VLAN
Linksys Smart Wi-Fi – Connectivity – VLAN

Note that if you are using digital voice (like me), you can’t use the above method because the WRT1900AC doesn’t come with a telephone jack. So you have no choice but to stick with what you have or bridge it like me.

Admin Interface
Since Belkin bought over Linksys in March 2013, Cisco Connect Cloud which I reviewed in the Cisco Linksys EA4500 Router has been renamed to Linksys Smart Wi-Fi.

The UI and functionality is pretty much the same and they made the UI much faster. I did complained about the slow UI in Cisco Connect Cloud in my review two years back.

There is a new feature which is the Network Map. Network Map is a visual representation of all the devices that are connected to the router. Using the network map, you can see the how strong the signal is to a device and which wireless band it is connected to. You can even check how much Internet bandwidth is the device using.

Linksys Smart Wi-Fi - Network Map
Linksys Smart Wi-Fi – Network Map

Linksys Smart Wi-Fi - Internet Usage
Linksys Smart Wi-Fi – Internet Usage

Since I am familiar with the UI having reviewed two Linksys routers before, I have no problem finding the respective screen to set things up. However if you are new to Linksys, it might take some time for you to familiarize with the UI. Having said that, I think the menu can be better organised/classified.

The UI on the stock firmware only allows you to configure very basic settings so unless you flash it with OpenWRT firmware (see below), don’t expect to configure advanced settings.

Linksys Smart Wi-Fi - Home
Linksys Smart Wi-Fi – Home

Linksys Smart Wi-Fi - Wireless
Linksys Smart Wi-Fi – Wireless

Linksys Smart Wi-Fi - Connectivity - Basic
Linksys Smart Wi-Fi – Connectivity – Basic

Linksys Smart Wi-Fi - Connectivity - Administration
Linksys Smart Wi-Fi – Connectivity – Administration

Linksys Smart Wi-Fi - Connectivity  - Local Network
Linksys Smart Wi-Fi – Connectivity – Local Network

Linksys Smart Wi-Fi - Connectivity - DHCP Reservations
Linksys Smart Wi-Fi – Connectivity – DHCP Reservations

Linksys Smart Wi-Fi - Security - Single Port Forwarding
Linksys Smart Wi-Fi – Security – Single Port Forwarding

Linksys Smart Wi-Fi - Security - Port Range Forwarding
Linksys Smart Wi-Fi – Security – Port Range Forwarding

Linksys Smart Wi-Fi - Security - Firewall
Linksys Smart Wi-Fi – Security – Firewall

Linksys Smart Wi-Fi - External Storage - Status
Linksys Smart Wi-Fi – External Storage – Status

Linksys Smart Wi-Fi - External Storage - Media Server
Linksys Smart Wi-Fi – External Storage – Media Server

Wireless Strength
I am surprised that having 4 external antennas on the WRT1900AC, it still losses out to the 6 internal antennas of the D-Link DIR-868L AC when it comes to wireless strength!

But since the external antennas of the WRT1900AC is removable and hence upgradable, I will probably replace it when Linksys releases the more powerful high-gain antennas.

Linksys WRT1900AC - With 4 Antennas (Front)
Linksys WRT1900AC – With 4 Antennas (Front)

Linksys WRT1900AC - With 4 Antennas (Back)
Linksys WRT1900AC – With 4 Antennas (Back)

WiFi Explorer - Toilet
WiFi Explorer – Toilet

WiFi Explorer - My Room
WiFi Explorer – My Room

As always, I am using WiFi Explorer to test the wireless strength at 2 locations in my house, my room and the toilet.

Location WRT1900AC DIR-868L My Net N900 EA6500 EA4500 DIR-855
My Room (2.4GHz) 76% 79% 75% 79% 78% 80%
My Room (5GHz) 78% 91% 64% 64% 65% 46%
Toilet (2.4GHz) 50% 58% 46% 53% 72% 56%
Toilet (5GHz) 46% 55% 35% 41% 33% 31%

Speed
I am on StarHub 300Mbps Fibre Home Broadband and from the Speedtest below, you can see everything is setup correctly and StarHub does delivers 300Mbps.

Speedtest
Speedtest

When it comes to LAN and wireless speed, WRT1900AC won in LAN to LAN and Wireless N (5GHz) to Wireless N (5GHz) speed but loses out to DIR-868L in LAN to Wireless N (5GHz).

Unfortunately I can’t test on Wireless AC because I don’t have any Wireless AC devices or adapter.

Speedy Net – 1Gbps LAN (iMac) to 1Gbps LAN (MacBook Air)

Speedy Net – 1Gbps LAN (iMac) to Wireless N 5GHz (MacBook Air)

Speedy Net – Wireless N 5GHz (iMac) to Wireless N 5GHz (MacBook Air)

In case you are wondering, I am using Speedy Net to test for the transfer speed.

Type WRT1900AC DIR-868L My Net N900 EA4500
LAN to LAN 780.27Mbps 500.19Mbps - -
LAN to Wireless N (5GHz) 146.14Mbps 217.61Mbps 113.48Mbps 107.81Mbps
Wireless N (5GHz) to Wireless N (5GHz) 146.91Mbps 75.71Mbps 63.01Mbps 65.17Mbps

OpenWRT
One of the best selling point of the WRT1900AC is the ability to run OpenWRT firmware on it eventually. Why I say eventually is because the firmware is not ready for public release and I am guessing it will not be ready till end of the year because of the ping pong between Linksys, OpenWRT and Marvell as clarified by Linksys below:

Linksys has built the WRT1900AC with every intention of providing open source capabilities and making it the best solution available to the community. Linksys has provided OpenWRT with an initial code release that enables open source firmware development. OpenWRT has requested some patches to provide more open source functionality at the Wi-Fi driver level that requires cooperation from Marvell.

Marvell is working on the usable driver and getting the required approvals through GPL. We are expecting this to be finalised and ready in the coming weeks. As soon as this is complete; the driver will be released to OpenWRT. We will continue to collaborate with OpenWRT to ensure they have the necessary software as requested.

In the meanwhile, an SDK based on Attitude Adjustment release of OpenWRT is posted here: https://github.com/wrt1900ac/opensource. This allows users to run OpenWRT FW on the WRT1900AC router.

Our aim is to provide a robust and high performing hardware and software platform for the open community developers to customise their WRT1900AC the way that they see fit. We will continue to work with the open source community and our chipset partners to ensure the developers have the necessary tools to do so.

Linksys Smart Wi-Fi Mobile App
The Linksys Smart Wi-Fi Mobile App is available on iOS and Android. The mobile app allows you to monitor and manage your Linksys Smart Wi-Fi Router. When it comes to managing your router, the app certainly has more features than the mydlink Lite mobile app.

Linksys Smart Wi-Fi iOS App - 5GHz NetworkLinksys Smart Wi-Fi iOS App - Connected Devices
Linksys Smart Wi-Fi iOS App

Linksys Smart Wi-Fi iOS App - OptionsLinksys Smart Wi-Fi iOS App - Firmware Update
Linksys Smart Wi-Fi iOS App

Linksys Smart Wi-Fi iOS App - AppStoreLinksys Smart Wi-Fi iOS App - Device List
Linksys Smart Wi-Fi iOS App

Summary
Priced at SGD$399, it is probably out of budget for most people getting a consumer router. However, if you have the money to spend and if you are a techie, I think it is a pretty good investment because of VLAN tagging and OpenWRT.

The external antennas is also another advantage because you can upgrade it to a more powerful high-gain one which Linksys plans to release soon.

If you need a more technical review on the Linksys WRT1900AC Router, checkout SmallNetBuilder review as well as the SmallNetBuilder tests on the Linksys WRT1900AC.

Pros:

  • Nicely designed
  • Nice UI
  • Pre-configured VLAN Tags
  • Capable of running OpenWRT firmware eventually
  • Can act as router, range extender (aka repeater) or wireless bridge
  • Removable and hence upgradable external antennas

Cons:

  • Expensive
  • Weaker wireless strength
  • Slow LAN to wireless speed

Linksys WRT1900AC
Linksys WRT1900AC

Asus RT-AC87U Router Launched in Singapore

$
0
0

The Asus RT-AC87U is the world’s first AC2400-class dual-band 802.11ac wireless router with a four-transmit, four-receive (4×4) antenna configuration. It is also the first in the world to employ multi-user MIMO (MU-MIMO) technology. It offers 5GHz speeds of 1.7334Gbit/s along with 2.4GHz speeds of 600Mbit/s for a combined total of 2.334Gbit/s. It comes with feature such as Asus AiRadar universal beamforming, adaptive Quality-of-Service (QoS) and AiProtection with exclusive Trend Micro security.

It was announced back in January 2014 at CES 2014 and it will finally be launching in Singapore at COMEX 2014. COMEX 2014 will take place at Level 4 and 6 of Suntec City Singapore from the Thursday, 28th August 2014 till Sunday, 31st August 2014. Opening hours are from 12pm till 9pm and admission is free. After COMEX 2014, you can get the router from all authorised Asus reseller like Challenger.

It will retail for SGD$399.

Technical Specifications

  • CPU: Broadcom BCM4709A
  • Switch: BCM4709A
  • RAM: 256MB
  • Flash 128MB
  • 2.4GHz Radio: Broadcom BCM4360
  • 5.0GHz Radio: Quantenna QSR1000
  • Speed
    • Concurrent dual-band 2.4GHz and 5GHz
    • 802.11ac: 5GHz (up to 1.734Gbps)
    • 802.11n: 5GHz (up to 600Mbps)
    • 802.11n: 2.4GHz (up to 600Mbps with Broadcom TurboQAM)
  • Ports:
    • 1x 10/100/1000Mbps WAN
    • 4x 10/100/1000Mbps Ethernet LAN (1 user-configurable as second WAN port)
    • 1x USB 3.0
    • 1x USB 2.0
  • Antennas: 4x external detachable antennas (4×4 MU-MIMO)
  • Management: ASUSWRT web-based admin console
  • Weight: 747g

If you are interested in getting the router, checkout SmallNetBuilder’s review on the Asus RT-AC87U Router: part 1 and part 2.

Asus RT-AC87U Router - Front
Asus RT-AC87U Router – Front

Asus RT-AC87U Router - Back
Asus RT-AC87U Router – Back

Viewing all 62 articles
Browse latest View live